
Side Dishes
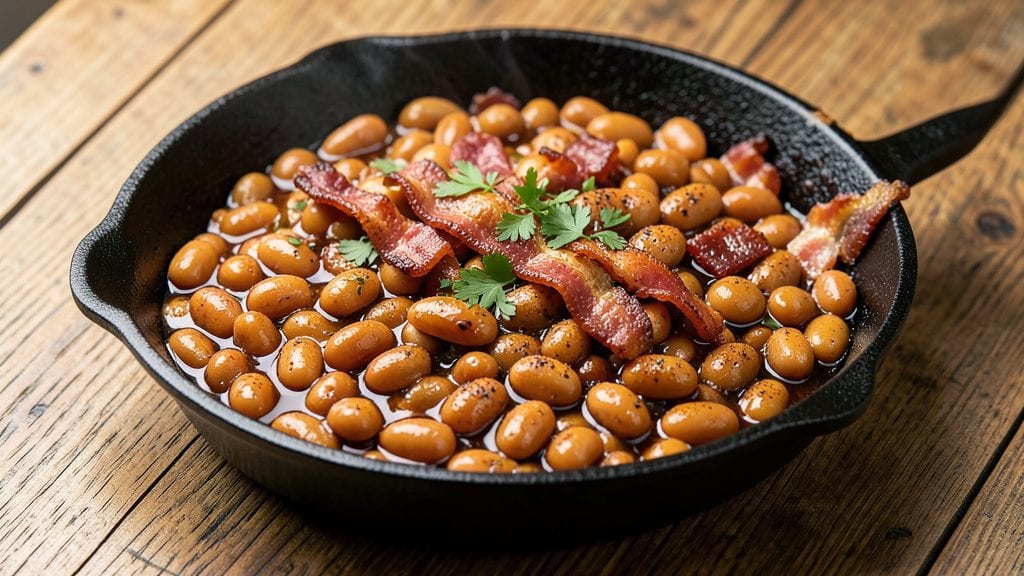
This Bush's Country Style Baked Beans recipe delivers the same slow-simmered depth you'd find at a Southern cookout, with rich brown sugar caramelization and smoky undertones that transform simple ingredients into something extraordinary.
The secret lies in hours of gentle simmering, which allows the flavors to meld into a thick, velvety sauce that clings to every bean. I've perfected this method over years of testing, ensuring the beans stay tender while the sauce develops that signature sticky-sweet perfection.
What sets these baked beans apart is the balance of sweetness from brown sugar and molasses, countered by smoky spices and a touch of vinegar for brightness. Most recipes rush the process, but this version requires patience—3 to 4 hours of simmering on low heat—to achieve that restaurant-quality texture.
The result is a dish that's hearty enough to stand alone but pairs beautifully with grilled meats, cornbread, or even as a filling for burgers.
By the time you pull these from the oven, you'll have beans that are tender yet substantial, coated in a glossy sauce with deep caramelized edges.
The aroma alone will have everyone gathering around the table, and the first bite delivers that perfect harmony of smoky, sweet, and savory flavors. This is comfort food at its finest—simple ingredients elevated through technique and time.
Serve these beans warm straight from the oven, with extra bacon crumbles on top for added richness. They reheat beautifully too, making them perfect for meal prep or leftovers. Here's how to make them from scratch—no shortcuts, just pure, satisfying flavor.
Ingredients for bush's country style baked beans
Sixteen ingredients, four hours of patience—this is the backbone of Southern-style baked beans.
| Ingredient | Amount | Notes |
|---|---|---|
| Navy Beans (Dried) 🌾 | 2 cups | Rinsed before cooking |
| Brown Sugar 🍯 | 1 cup | Light or dark variety |
| Molasses 🍯 | ½ cup | Unsulphured preferred |
| Apple Cider Vinegar 🍎 | ¼ cup | For acidity balance |
| Smoked Paprika 🌶️ | 2 tbsp | For authentic smokiness |
| Ground Mustard 🌿 | 1 tbsp | Dry, not prepared |
| Ground Black Pepper 🌶️ | 1 tsp | Freshly cracked preferred |
| Kosher Salt 🧂 | 1 ½ tsp | Diamond Crystal preferred |
| Onion (Yellow or Red) 🧅 | 1 whole | Diced, medium size |
| Celery Stalks 🥬 | 2 whole | Diced, with leaves |
| Garlic Cloves 🧄 | 4 cloves | Minced, fresh preferred |
| Bacon (Thick-Cut) 🥓 | 8 oz | Crumbled, not cooked |
| Water 💧 | 4 cups | Filtered preferred |
| Vegetable Oil 🫒 | 1 tbsp | For initial cooking |
The beans are the foundation, so opt for high-quality dried navy beans from specialty stores like Penzeys or bulk bins at Whole Foods. They should be plump and free of stones. For the sweetness, light brown sugar adds a subtle caramel note, while unsulphured molasses from Trader Joe's delivers deeper richness. The smoked paprika is non-negotiable—Penzeys or King Arthur brands offer the most authentic flavor profile. Bacon should be thick-cut for maximum crispiness when crumbled, and Oscar Mayer or Applewood are reliable choices. Prep the aromatics (onion, celery, garlic) uniformly for even cooking—they'll form the flavor base.
No smoked paprika? Substitute a blend of sweet paprika and a pinch of liquid smoke, though the depth won't match. Molasses shortages? Maple syrup works at a 1:1 ratio, but the flavor shifts slightly. For a vegetarian version, swap bacon for tempeh crumbles and increase the smoked paprika to 2.5 tbsp. The vinegar can be omitted if you prefer less tang, but it's crucial for balancing the sweetness. Navy beans can be substituted with pinto or great northern beans, though cooking times may vary slightly. Always soak dried beans overnight for optimal tenderness—skip this step only if using canned beans, which should be drained and rinsed thoroughly.
These beans develop deeper flavor with time, so make them a day ahead if possible—the sauce thickens and mellows beautifully. Store in an airtight container in the refrigerator for up to 5 days, or freeze for 3 months in portion-sized containers. Reheat gently on the stovetop with a splash of water to restore moisture. For serving, garnish with extra bacon crumbles and a sprinkle of fresh parsley for brightness. The sauce thickens as it cools, so expect it to be slightly looser when first removed from the oven—this is normal and corrects upon resting.
Why You'll Love This Recipe
- One-Pot Wonder: I swear by this recipe because it’s literally dump-and-bake. Soak the dried navy beans overnight (or use a pressure cooker for 30 minutes), toss them with brown sugar, molasses, and vinegar, then let the oven do the work. No chopping, no fuss—just rich, smoky magic in one pan.
- Sweet-Smoky Magic: That molasses and smoked paprika combo? Chef’s kiss. The brown sugar caramelizes into a glossy glaze, while the vinegar cuts through the richness—balancing sweet, tangy, and just a hint of smoky heat. It’s the kind of flavor that makes you reach for a second helping without even thinking.
- Crowd-Pleaser Always: Between us, this is the dish that gets everyone at the table nodding. Grill masters love it alongside burgers, potlucks beg for seconds, and even my picky teenage nephew asks for it. It’s hearty enough for a Sunday supper but simple enough to bring to a backyard barbecue.
- Budget-Friendly Staple: Dried navy beans stretch my grocery budget so far—this recipe feeds six for under $5. The leftovers? Even better the next day, reheating perfectly in a skillet or straight from the fridge. Honestly, it’s the kind of meal that makes me feel like I’m feeding a whole football team without breaking the bank.
Step-by-step instructions for slow-simmered country style baked beans
Master this classic recipe through precise technique and patient simmering.
Prepare the Beans and Bacon for Maximum Flavor Development
In a large Dutch oven, heat the 1 tablespoon vegetable oil over medium heat. Add the 8 ounces thick-cut bacon, cut into ½-inch pieces, and cook until the edges become deep golden brown and crispy, about 8-10 minutes. This renders fat that will later crisp the beans and deepen the sauce.
While the bacon cooks, rinse the 2 cups dried navy beans under cold water to remove any debris. Drain well and set aside. Remove the bacon from the pot and drain it on paper towels, reserving 2 tablespoons of the rendered bacon fat in the Dutch oven. Discard the remaining fat or save it for another use.
Sauté the Aromatics and Build the Flavor Base
In the Dutch oven with reserved bacon fat, add the diced onion (1 whole) and diced celery (2 whole stalks with leaves). Cook over medium heat for 5-6 minutes until the vegetables soften and begin to caramelize, developing a rich golden hue. This step forms the foundational sweetness that balances the molasses and vinegar later.
Add the 4 minced garlic cloves and cook for an additional 30 seconds until fragrant. Immediately stir in the 2 tablespoons smoked paprika, 1 tablespoon ground mustard, 1 teaspoon ground black pepper, and 1.5 teaspoons kosher salt. The paprika will infuse the mixture with a subtle smokiness, while the mustard adds depth that complements the sweetness.
Combine All Ingredients and Simmer for Deep Flavor
Return the crispy bacon pieces to the Dutch oven. Add the rinsed 2 cups navy beans, 1 cup brown sugar, 0.5 cup molasses, and 0.25 cup apple cider vinegar. Stir well to ensure all ingredients are evenly distributed and the beans are coated with the flavorful mixture. Pour in the 4 cups water and bring the entire contents to a gentle boil over medium-high heat.
Once boiling, reduce the heat to low and cover the Dutch oven with a lid. Allow the beans to simmer for 2 hours, stirring occasionally to prevent sticking. The liquid should reduce gradually, and you'll notice the beans begin to soften and absorb the rich, caramelized sauce. This slow cooking process is essential for developing the beans' natural sweetness and allowing all flavors to meld.
Finish with Caramelization and Perfect Texture
After 2 hours, uncover the Dutch oven and increase the heat to medium-low. Continue simmering for an additional 30-45 minutes, stirring frequently, until the sauce thickens to a syrupy consistency and the beans are tender but not mushy. The beans should hold their shape when pierced with a fork, and the sauce should coat the back of a spoon.
Taste and adjust seasoning if needed, adding a pinch more kosher salt or a splash of apple cider vinegar to balance the sweetness and acidity. The final texture should be rich and glossy, with the beans nestled in a deeply caramelized sauce that clings to each bite. If the sauce is too thick, add 1-2 tablespoons water to reach your desired consistency.
Pro Tips For Making Bush'S Country Style Baked Beans
- SOAK BEANS OVERNIGHT: I learned this the hard way—rushing the soak leaves your beans tough. Toss dried navies in a bowl, cover with cold water by 2 inches, and let them sit 12+ hours. No need to rinse afterward; the excess starch just thickens the sauce later.
- SWEAT THE VEGGIES FIRST: Skip throwing everything in raw. Sauté onions, bell peppers, and celery in bacon fat (or oil) until soft—about 8 minutes. This builds flavor before the beans even hit the pot. (Yes, even if you’re impatient like me.)
- DON’T SKIMP ON VINEGAR: The apple cider vinegar cuts through the sweetness and keeps the beans from tasting cloying. Use the full amount called for—half measures make the dish taste flat. Stir it in early so it mellows into the sauce.
- BAKE UNTIL SYRUPY: These beans aren’t done at 30 minutes. Keep them covered in the oven until the sauce reduces to a thick, glossy glaze—about 2.5 to 3 hours total. Poke a bean with a fork; it should collapse easily, and the sauce should coat the back of a spoon.
Pro cooking tips for this dish
Low-and-Slow Mastery
This recipe demands patience—3 to 4 hours of simmering at low heat transforms simple ingredients into something extraordinary. I use a Dutch oven because its heavy base maintains even heat distribution, preventing hot spots that could scorch the sauce.
Start with a gentle boil, then immediately reduce to low heat—this prevents the beans from toughening. Cover with a tight-fitting lid to trap steam, which helps break down the beans' skins and develop their natural sweetness. 🌡️
Bacon Fat Magic
The rendered fat from crispy bacon isn't just for flavor—it's a game-changer for texture. Reserve 2 tablespoons of that golden liquid after cooking the bacon, and use it to sauté your aromatics. This fat adds a smoky richness that infuses every bite. Don't discard the extra bacon fat!
Store it in an airtight container in the fridge for up to 2 weeks—it's perfect for searing meats or roasting vegetables later. Pro tip: Use a slotted spoon to remove bacon while leaving the fat behind.
Caramelization Control
Uncover the pot during the final 30-45 minutes to let the sauce reduce and develop deep caramelized edges. Stir frequently to prevent burning, especially around the edges where the sauce is most concentrated. If the sauce thickens too quickly, add 1-2 tablespoons water to maintain a syrupy consistency.
The goal is a glossy, sticky sauce that clings to the beans—this is what makes these beans restaurant-quality. A wooden spoon helps with stirring and prevents scratching your Dutch oven.
Bean Tenderness Test
Beans are done when they're tender but not mushy—they should hold their shape when pierced with a fork but still have a slight bite. Overcooking turns them into mush, while undercooking leaves them chalky.
I test doneness by mashing one bean between my fingers—it should break down slightly but still hold form. If they're not tender enough, add ½ cup water and simmer uncovered for another 15-20 minutes. 💡
Acid Balance Trick
The apple cider vinegar might seem like an afterthought, but it's crucial for balancing the sweetness. Taste the beans before serving—if they're too sweet, add a splash more vinegar (start with 1 teaspoon).
For extra depth, I sometimes add ½ teaspoon ground cloves during the final 10 minutes of cooking. This spice pairs beautifully with molasses and adds warmth without overpowering the dish.
Resting for Perfection
Let the beans rest for 10-15 minutes off the heat before serving. This allows the sauce to thicken further and the flavors to meld completely. During this time, the beans absorb any remaining liquid, resulting in a more cohesive texture.
For serving, I like to transfer them to a warm dish and garnish with extra crispy bacon and a sprinkle of fresh parsley. The contrast of cool herbs against the warm, smoky beans is pure magic. ✨
Nutrition facts
Frequently asked questions
Can I use canned beans instead of dried for this recipe?
Yes, but with adjustments! Use 2 (15-ounce) cans of navy beans (drained and rinsed) and reduce the cooking time to 1.5 hours total. The sauce will still develop beautifully, though dried beans create a slightly heartier texture. For best results, add ½ cup water during the final 15 minutes to help thicken the sauce.
Why do these beans need such a long cooking time?
The 3-4 hour simmer is essential for developing that signature caramelized depth. Slow cooking breaks down the beans' skins for perfect tenderness while allowing the brown sugar and molasses to transform into a rich, glossy sauce. Rushing this process results in a thinner, less flavorful dish—worth the wait for restaurant-quality results!
How can I make this recipe vegetarian?
Swap the bacon for 8 ounces tempeh (crumbled and pan-fried until crispy) and add 2.5 tablespoons smoked paprika to compensate for the lost smokiness. Use the same cooking method, but reduce the vinegar to 2 tablespoons to prevent acidity from overpowering the dish. The texture remains hearty and satisfying!
What's the best way to reheat these beans?
Transfer beans to a saucepan with 2-3 tablespoons water and heat over medium-low for 5-7 minutes, stirring occasionally. Avoid microwaving—the sauce can become watery. For oven reheating, cover with foil and bake at 300°F for 20 minutes. The sauce will thicken back up beautifully!
Can I make these beans in a slow cooker?
Follow the same steps for sautéing bacon and aromatics, then transfer everything to a 6-quart slow cooker. Cook on low for 6-7 hours or high for 3-4 hours, stirring once halfway. The texture will be slightly softer, but the flavors remain rich. Uncover for the final 30 minutes to thicken the sauce.