
Side Dishes
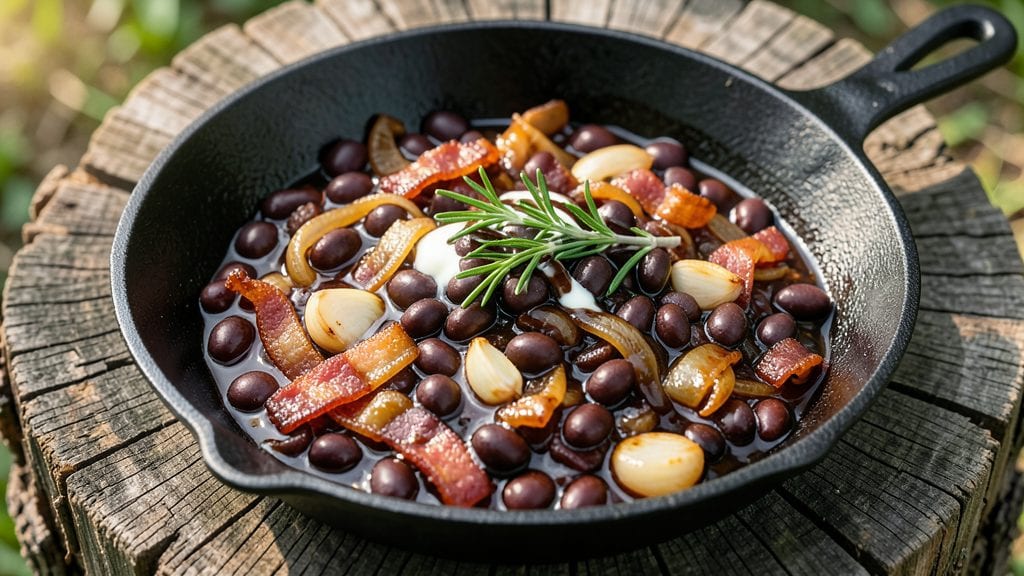
This one-pot camping beans recipe transforms simple pantry staples into a hearty, smoky side that thrives over campfires or portable stoves. The bacon adds rich depth while molasses caramelizes into a sweet-savory crunch, turning a basic bean dish into a meal that feels like a campfire classic.
I developed this after years of testing portable recipes—it’s the one that finally earned me compliments instead of "Is this really camping food?"
What makes this recipe perfect for the outdoors is its foolproof one-pot method, requiring just 30 minutes of active prep and 45 minutes of simmering.
Pre-soak the beans overnight (or use canned for convenience) to save time, then let the Dutch oven or camp stove do the work while you handle other camp chores.
The bacon renders its fat into the beans, creating a self-basting flavor that needs no extra oil, and the molasses adds a caramelized texture that’s impossible to resist.
By the time you’re done, you’ll have a pot of tender, smoky beans with crispy bacon bits and a molasses glaze that sticks to every spoonful. The aroma alone will have everyone at camp gathering around your fire, and the leftovers reheat perfectly for breakfast the next morning.
This isn’t just a side dish—it’s the centerpiece of any campfire meal, turning basic ingredients into something extraordinary with minimal effort.
Pair it with tortillas for wraps, rice for a heartier meal, or serve it straight from the pot with crusty bread to soak up every last bite.
The beauty of this recipe is its versatility—it works equally well for a solo camping trip or a group gathering, and the flavors only deepen as it sits. Here’s how to make it happen over any heat source.
Ingredients for camping beans
Pantry staples plus bacon and molasses—this one-pot camping beans recipe turns simple ingredients into a smoky, sweet-savory campfire classic.
| Ingredient | Amount | Notes |
|---|---|---|
| Dry Navy Beans 🌱 | 1 ½ cups | Unsoaked or canned for convenience |
| Bacon 🥓 | 8 oz | Thick-cut for best flavor |
| Unsalted Butter 🧈 | 2 tbsp | Full-fat for rich flavor |
| Molasses 🍯 | ¼ cup | Dark preferred for depth |
| Yellow Onion 🧅 | 1 whole | Diced, medium size |
| Garlic Cloves 🧄 | 3 cloves | Minced, fresh preferred |
| Vegetable Broth 💧 | 2 cups | Low-sodium preferred |
| Tomato Paste 🍅 | 2 tbsp | Smooth, no sugar added |
| Smoked Paprika 🌶️ | 1 tsp | For smoky depth |
| Ground Black Pepper 🌶️ | ½ tsp | Freshly cracked |
| Salt 🧂 | 1 tsp | Adjust to taste |
| Bay Leaf 🍃 | 1 whole | For aroma |
| Fresh Thyme 🌿 | ½ tsp | Dried works if needed |
The bacon is non-negotiable here—thick-cut from Oscar Mayer or your local butcher gives the best flavor. Look for bacon with a good amount of fat; it renders into the beans, creating that self-basting richness. Costco often has great deals on bulk bacon, but a single package works fine for this recipe. If you're using dry beans, they need to soak overnight (or at least 8 hours), but canned beans save time—just drain and rinse them. The molasses? Goya or Grandma's are solid choices, and dark molasses adds more depth than light. Grab a small bottle—it keeps forever and makes everything taste better.
No bacon? Smoked sausage or ham hocks work in a pinch, though the flavor won’t be identical. Short on molasses? Maple syrup or brown sugar can mimic the sweetness, but you’ll lose that caramelized crunch. Fresh thyme is ideal, but dried at one-third the amount gets you close. The tomato paste can be from a tube or a can—Trader Joe's sells single-serve tubes that are perfect for camping. If you’re prepping ahead, make the bacon and sauté the onions/garlic first, then store them separately until you’re ready to cook over the fire. The beans and broth can soak and sit for days, so this recipe really works for lazy camp mornings.
This reheats like a dream—better the next day once all the flavors meld. Store leftovers in the pot with the lid on, and they’ll keep for 3-4 days in a cooler with ice packs. For longer storage, portion into containers and freeze for up to 3 months. The bacon bits crisp up again when reheated, so don’t skip them. If you’re cooking over a fire, let the beans simmer uncovered the last 10 minutes to thicken slightly—it’s worth the extra minute. Serve straight from the pot with tortillas or bread, and everyone will think you’re a camping pro.
Why You'll Love This Recipe
- One-Pot Wonder: I swear by this recipe for lazy nights—just toss everything in one pot, simmer, and walk away. No chopping, no fussing, no extra dishes. The bacon renders while the beans soak, and by the time the onions caramelize, dinner’s basically made itself.
- Molasses Magic: That dark, sticky molasses? It’s the secret weapon here. A splash at the end turns this from good to oh-my-gosh in one spoonful—deep, smoky, and just sweet enough to balance the salty bacon. Honestly, I’ve tried skipping it, and I always regret it.
- Campfire to Kitchen: Between us, this is the only bean dish that works as well over a fire as it does on the stove. Dry beans soak overnight, then cook low and slow—perfect for a weekend trip or a weeknight when you’re too tired to think. The butter at the end? Pure luxury, no matter where you are.
- Budget-Friendly Staple: Navy beans and bacon stretch for days, and I mean days. Make a big batch, store it in the fridge, and eat it for lunch the next three days without blinking. Plus, the molasses and butter feel indulgent without breaking the bank—this is comfort food that actually makes sense.
Step-by-step instructions for one-pot camping beans
Here's how to make this hearty, smoky dish with minimal cleanup and maximum flavor.
Cook the Bacon and Sauté the Onion
Start by placing the 8 oz bacon in a large, heavy-bottomed pot over medium heat. Let it cook undisturbed for 5-6 minutes until the edges start to crisp. This is when the magic happens—the fat will render out and create a smoky base for your beans. Once the bacon is about 75% cooked, use tongs to transfer it to a paper towel-lined plate, leaving the rendered fat in the pot.
In the same pot, add the 1 whole yellow onion that you've diced into ¼-inch pieces. Cook the onions in the bacon fat over medium heat for 5-6 minutes, stirring occasionally, until they soften and turn golden brown. You'll smell that sweet, caramelized aroma—this builds the flavor foundation. If the onions start to stick, add 1-2 tablespoons of water to deglaze the pan and keep them moving.
Add Aromatics and Build the Flavor Base
Push the onions to one side of the pot and add the 2 tbsp unsalted butter. Once the butter melts, add the 3 cloves garlic cloves that you've minced, along with the 1 tsp smoked paprika, 0.5 tsp ground black pepper, and 0.5 tsp fresh thyme. Stir everything together for 1-2 minutes until the garlic becomes fragrant and the spices are evenly distributed. You'll notice the kitchen filling with that warm, smoky garlic scent—this is the moment that matters.
Now stir in the 2 tbsp tomato paste and cook for another 1 minute until it darkens slightly. This step deepens the flavor and adds a rich, umami backbone to your beans. If you're using dried thyme, add it now along with the 1 whole bay leaf. The tomato paste will thicken slightly, but don't worry—we'll loosen it up later with the broth.
Combine Everything and Simmer
Add the 1.5 cups dry navy beans to the pot and give everything a good stir to coat the beans in the flavorful mixture. Pour in the 2 cups vegetable broth and bring the mixture to a gentle boil over medium-high heat. Once boiling, reduce the heat to low and add the 1 tsp salt. Here's the thing—you want the beans to simmer, not boil vigorously, which can cause them to toughen.
Cover the pot with a lid and let the beans simmer for 45-50 minutes, stirring occasionally to prevent sticking. You'll know they're ready when they're tender but still hold their shape—they should be easy to crush between your fingers but not mushy. If the liquid level gets too low, add ½ cup water to keep everything moist. The bacon you set aside earlier can be crumbled back into the pot now if you'd like extra richness.
Finish with Molasses and Rest
Once the beans are tender, stir in the 0.25 cup molasses and the crumbled bacon (if using). Let the mixture simmer uncovered for another 5-7 minutes to allow the molasses to caramelize slightly and meld with the other flavors. You'll see the beans glisten with a beautiful sheen—the molasses adds that perfect sweet-savory balance. Taste and adjust the seasoning if needed, adding more salt or pepper as necessary.
Remove the pot from heat and let the beans rest for 10 minutes before serving. This resting period allows all the flavors to settle and the beans to absorb any remaining liquid. The dish should have a thick, hearty consistency with a rich, smoky-sweet taste. Serve warm straight from the pot—this one-pot wonder is perfect for camping trips or cozy nights at home with minimal cleanup.
Pro Tips For Making Camping Beans
- SOAK BEANS OVERNIGHT: I learned this the hard way—rushing the soak leads to tough beans. Use 3 cups water per cup beans, cover, and let them sit 12+ hours (or quick-soak: boil 2 minutes, then off heat for 1 hour). Navy beans need this time to soften properly, especially when camping where you can’t babysit the pot.
- COOK BACON LOW AND SLOW: Skip the sizzle-fry temptation. Cook bacon at 275°F (135°C) until tender but not crispy—you’ll render more fat for flavor. Drain on paper towels, but save that fat: it’s liquid gold for sautéing onions and preventing dry beans later.
- SWAP ONION FOR GARLIC: Onions burn easily in cast iron, especially with molasses. Use 3 cloves minced garlic instead—it caramelizes faster and adds depth without risking bitter notes. If you must use onion, dice it small and cook it in the bacon fat until translucent before adding beans.
- STIR BEANS EARLY AND OFTEN: The first 20 minutes are critical. Stir beans frequently to prevent scorching (especially with molasses, which burns fast). After that, reduce heat to a simmer and let them cook uncovered—this helps thicken the sauce naturally and evens out the texture.
Make-ahead tips for this camping beans
Pre-Soak for Speed
Save 30-45 minutes of campfire time by pre-soaking your beans overnight in a 500ml mason jar with cold water and a pinch of salt. I use a 1:3 beans-to-water ratio—so 1.5 cups beans gets 4.5 cups water.
Store the jar in your fridge, and the beans will be ready to drain and cook the next day. For even faster prep, use canned beans—just drain, rinse, and add them directly to your pot with the broth. 🌱
Portable Prep Stations
Organize your ingredients in small, stackable containers (like Rubbermaid Select 16oz containers) to create a portable prep station. Divide chopped onions, minced garlic, and spices into separate containers, and store the bacon and molasses in their original packaging.
This keeps everything dry and accessible while you set up camp. I keep my containers in a large Ziploc bag with a few ice packs to maintain freshness. ✨
Slow Cooker Hack
If you're using a portable electric slow cooker (like the Zojirushi or Hamilton Beach models), prep everything at home and transfer it directly to the slow cooker. Cook on low for 6-8 hours or high for 3-4 hours—this is perfect for long hikes or overnight trips.
The slow cooker maintains a consistent temperature, so you won’t need to babysit the pot. Just add the molasses and bacon in the last 15 minutes of cooking. 🔥
Leftovers Strategy
Store leftovers in the original cooking pot with a tight-fitting lid, and place it in a cooler with ice packs for up to 3 days. The beans will actually taste better the next day as the flavors meld.
For longer storage, portion into 1-cup servings in freezer-safe containers and freeze for up to 3 months. Reheat portions in a small pot over a camp stove or microwave at home—just add 1-2 tablespoons of water to prevent drying out. 💡
Campfire Simmering Tips
If cooking over an open flame, use a Dutch oven (like Lodge) for even heat distribution. Place the pot on a stable grate or rock to elevate it off the fire, and adjust the flame to maintain a gentle simmer.
I like to use charcoal briquettes for steady heat—just arrange them in a circle around the pot. If the fire gets too hot, move the pot to the edge of the heat source.
The key is patience: let the beans simmer uncovered for the last 10 minutes to thicken slightly. 🌡️
Flavor Boosters
Pack a small spice kit with extra smoked paprika, black pepper, and salt to adjust flavors on the fly. A squeeze of lemon juice brightens the dish if it tastes too heavy, while a sprinkle of fresh parsley adds freshness.
For a smoky kick, add ½ tsp liquid smoke (like Coltman's) to the broth before simmering. These tweaks turn a good meal into a great one with minimal effort. 💛
Nutrition facts
Frequently asked questions
Can I use canned beans instead of dry beans for camping?
Canned beans are the perfect camping shortcut—just drain and rinse them before adding to your pot with the broth. This cuts prep time by hours and eliminates the need for soaking. For best results, use low-sodium beans and add extra salt to taste at the end.
How do I adjust this recipe for a portable stove vs. campfire?
For a portable stove, use a medium-sized pot and maintain a gentle simmer—never a rolling boil. On a campfire, a Dutch oven works best; place it on a grate or rocks to control heat. The key is patience: simmer uncovered the last 10 minutes to thicken the sauce.
What if I don’t have molasses? Can I substitute?
Yes! Use maple syrup or brown sugar (1:1 ratio) for sweetness, but you’ll lose the caramelized crunch. For depth, add ½ tsp vanilla extract or a pinch of cinnamon. The dish will still be delicious—just slightly different.
How long will these beans keep in a cooler?
Store leftovers in the original pot with a lid, surrounded by ice packs in a cooler. They’ll stay fresh for 3-4 days and actually taste better the next day as flavors meld. For longer trips, freeze portions in 1-cup servings for up to 3 months.
Can I make this recipe vegetarian?
Swap bacon for smoked sausage or tempeh, and use vegetable broth instead of meat-based. Add 1 tbsp soy sauce or miso paste for umami depth. The molasses and spices will still shine!