
Sauces & Condiments
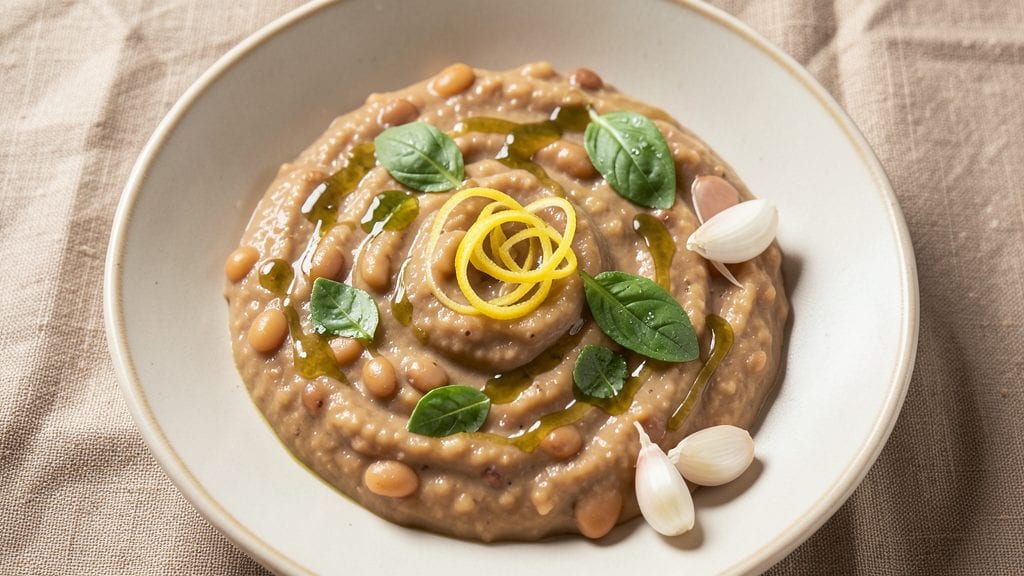
Creating a cannellini bean puree that’s silky-smooth and packed with flavor is the secret weapon I’ve been using to elevate soups, dips, and pasta dishes. This isn’t just any bean puree—it’s a vegan, ultra-versatile base that transforms ordinary meals into something restaurant-worthy.
After years of testing, I’ve perfected a method that guarantees a velvety texture without grittiness, using just a few simple ingredients and a high-speed blender.
The foundation of this puree is cannellini beans, soaked overnight to soften and reduce cooking time dramatically. I add garlic, olive oil, and lemon juice for brightness, then blend until completely smooth—no lumps, no grit, just pure, creamy goodness.
The key is patience: letting the beans soak and blending in stages ensures a flawless finish every time. This isn’t just a side dish; it’s a flavor booster that works in everything from creamy soups to dips and even as a vegan cheese substitute.
What you’ll end up with is a silky, aromatic puree that’s ready to use immediately or store for up to a week in the fridge.
The possibilities are endless: stir it into minestrone for extra richness, spread it on toast with a sprinkle of salt and pepper, or use it as a base for vegan Alfredo sauce. The best part? It’s foolproof—no special equipment required beyond a blender and a little time.
Let’s get started on making this versatile puree that’ll become a staple in your kitchen.
For those who love to experiment, I’ve included variations like roasted garlic for depth, fresh herbs for brightness, or a dash of chili flakes for heat. Each twist keeps the puree’s smooth texture while adding new layers of flavor.
Whether you’re vegan, gluten-free, or just looking for a simple way to boost your meals, this puree delivers. Here’s how to make it perfectly every time.
Ingredients for cannellini bean puree
Seven simple ingredients transform into a velvety puree perfect for soups and dips.
| Ingredient | Amount | Notes |
|---|---|---|
| Dried Cannellini Beans 🌾 | 1 ½ cups | Unsoaked, rinsed well |
| Extra-Virgin Olive Oil 🫒 | ½ cup | High quality, fruity |
| Garlic Cloves 🧄 | 4 cloves | Fresh, peeled, rough chopped |
| Lemon Juice 🍋 | 2 tbsp | Freshly squeezed |
| Sea Salt 🧂 | 1 ½ tsp | Fine grain preferred |
| Fresh Basil Leaves 🌿 | ¼ cup | Packed, stems removed |
| Nutritional Yeast 🧀 | 2 tbsp | For cheesy flavor |
| Water 💧 | 2 cups | For soaking beans |
The beans are the star—dried cannellini from Whole Foods or bulk bins work best, but any canned beans in a pinch (just drain and rinse). Soak overnight in cold water (that's the secret to silky texture) or quick-soak with boiling water for 1 hour. Fresh garlic is non-negotiable here—it makes all the difference. I grab mine at Trader Joe's where they're always fresh. The olive oil should be extra-virgin—cheap oil tastes like soap in the puree. And trust me on the nutritional yeast—it adds that umami punch that makes this taste restaurant-worthy.
No fresh basil? Dried oregano at half the amount works, but you'll miss that fresh brightness. Short on garlic? Roast 2 extra cloves with the beans for deeper flavor. The lemon juice can be bottled, but fresh is brighter (and you'll use it anyway). Want more richness? Add 1 tbsp tahini or 1/4 cup cashew cream. For a spicy kick, blend in 1/4 tsp chili flakes. The puree freezes beautifully—just portion into ice cube trays before freezing.
This keeps for 5-7 days in the fridge, sealed tightly under olive oil. For freezing, portion into 1/2 cup servings—thaws perfectly for quick soups. I always make a double batch because it disappears fast. The puree thickens as it chills, so thin with water or plant milk if needed. Perfect for everything from creamy pasta to vegan dips—your kitchen will never be the same.
Why You'll Love This Recipe
- No-Soaking Required: I’ll admit, I used to dread soaking beans—but these dried cannellinis soften beautifully with just a quick overnight soak or even a pressure cooker. That means no forgotten jars on the counter, no fuss, just smooth, creamy magic when I’m ready.
- Garlic-Lemon Magic: The moment I blend in roasted garlic and a splash of lemon juice? Instant brightness. That sharp citrus cuts through the richness of the olive oil, while the garlic adds this deep, toasty warmth. It’s the kind of flavor that makes you pause mid-spoonful.
- Dip, Spread, Sauce: Between us, this puree is my pantry’s secret weapon. Slather it on toast with chili flakes, toss it into pasta, or serve it as a dip with crusty bread—it’s that adaptable. Honestly, I’ve even used it as a base for veggie burgers (yes, it holds up).
- Budget Meal Upgrade: A pound of dried beans costs less than a fancy sauce, and this recipe stretches to feed four for dinner with leftovers that taste just as good cold the next day. I freeze extras in ice cube trays—perfect for quick weeknight sauces or soups when I’m low on time.
Step-by-step instructions for ultra-smooth cannellini bean puree
Creating this velvety bean puree is simpler than you think—just follow these precise steps.
Soak the Dried Cannellini Beans
Place the 1.5 cups dried cannellini beans in a medium bowl and cover them completely with the 2 cups water. Let them soak at room temperature for at least 8 hours, or overnight for best results. This long soak ensures the beans soften evenly and blend smoothly without gummy texture.
After soaking, drain the beans thoroughly in a colander, giving them a gentle shake to remove excess water. The beans should feel tender when pressed between your fingers—this is your signal they're ready for cooking. If they still feel firm, soak for another 2-3 hours before proceeding.
Cook Until Fork-Tender
Transfer the soaked beans to a medium saucepan and add fresh 2 cups water. Bring to a boil over medium-high heat, then immediately reduce to a gentle simmer. Cook uncovered for 45-60 minutes, stirring occasionally, until the beans are fork-tender with no resistance.
Here's the thing—don't rush this step. The beans need to break down completely for that ultra-smooth texture. You'll know they're ready when they mash easily between a fork and the back of a spoon, with no hard centers remaining. Keep an eye on the water level and add a splash if needed to prevent burning.
Blend with Olive Oil and Garlic
Drain the cooked beans thoroughly once more. In a high-speed blender, combine the beans with the 0.5 cup extra-virgin olive oil, 4 cloves rough chopped garlic, and 1.5 teaspoons sea salt. Blend on high for 1-2 minutes, scraping down the sides as needed, until completely smooth.
This is where the magic happens—the olive oil emulsifies with the beans, creating that luxurious texture. If your puree looks too thick, add 1-2 tablespoons water at a time until you reach your desired consistency. The garlic should blend completely, adding depth without being noticeable as separate pieces.
Finish with Bright Flavors
Transfer the puree to a medium saucepan and place over low heat. Stir in the 2 tablespoons lemon juice and 2 tablespoons nutritional yeast, warming gently for 3-4 minutes. This step brightens the flavors and activates the nutritional yeast's cheesy notes.
While warming, taste and adjust seasoning—you might need a touch more salt or lemon depending on your taste preferences. The puree should be silky smooth with a vibrant, herby aroma. Remove from heat immediately after warming to prevent separating.
Incorporate Fresh Basil
In a separate blender or food processor, pulse the 0.25 cup fresh basil leaves until finely chopped. Stir this into the warm bean puree and blend briefly just to combine—you want the basil to be finely distributed without over-processing.
This final step adds freshness and color. The basil should be evenly distributed throughout the puree, giving each spoonful that bright, garden-fresh quality. For an even smoother texture, you can strain the puree through a fine-mesh sieve, though this step is optional for a more rustic texture.
Pro Tips For Making Cannellini Bean Puree
- SOAK BEANS OVERNIGHT: Skip the quick-soak shortcut—dried cannellini beans need at least 12 hours in water to soften properly. I learned this the hard way when my puree turned out gritty and uneven; cold water overnight does the heavy lifting for you.
- CRUSH BEANS IN BATCHES: Puree the beans in small portions, not all at once. Cannellini skins can clog your food processor, and forcing it leads to a chunky mess. Work in 2-cup increments, scraping the sides religiously—your future self will thank you.
- ROAST GARLIC FIRST: Toss 2 whole garlic cloves in olive oil, wrap in foil, and roast at 400°F for 20 minutes before blending. The sweet, caramelized flavor beats raw garlic every time, and it blends right into the puree without overpowering it.
- SALT THE COOKING WATER: Add 2 tablespoons of salt to the bean-soaking water—yes, even if you’re using dried beans. It seasons the beans from the start, and you won’t need to adjust the final puree’s saltiness later. (I used to skip this and always ended up guessing.)
Make-ahead tips for this dish
Batch Prep Strategy
Make this puree in double batches—it disappears faster than you’d think. I always prepare 4 cups at a time, storing half in the fridge and freezing the other half in ½ cup portions (perfect for quick soups).
The key is using a high-speed blender like a Vitamix—it handles larger quantities without overheating. 💫
Freezing for Future Use
Portion the puree into silicone ice cube trays or small airtight containers before freezing. This prevents freezer burn and makes it easy to thaw just what you need. When ready to use, thaw overnight in the fridge or microwave for 30 seconds—it reheats beautifully for soups or dips.
The texture remains silky after freezing, unlike some bean purees that turn grainy.
Fridge Storage Tips
Store your puree in a glass jar or airtight container with a layer of olive oil on top to preserve freshness. It keeps for 5-7 days in the fridge, but I’ve had mine last up to 10 days if sealed tightly.
Stir well before using—it thickens slightly as it chills. For extra flavor, add a splash of water or lemon juice when reheating to restore creaminess.
Make-Ahead for Meals
This puree is my go-to for meal prep Sundays. I blend it ahead and store it in small jars for easy grab-and-go use. Use it as a base for creamy pasta, stir into minestrone, or spread on toast with chili flakes.
The prep takes 10 minutes of active time (plus soaking), but the payoff is worth it—no last-minute cooking needed during the week.
Reviving Day-Old Puree
If your puree thickens overnight, thin it with 1-2 tablespoons of water or plant milk. For extra richness, stir in 1 teaspoon tahini or a splash of lemon juice to brighten flavors.
I’ve even reheated leftovers straight from the fridge for quick dips—just add a pinch of salt and a drizzle of olive oil to revive it.
Kitchen Hacks
Short on time? Use canned cannellini beans (drained and rinsed) for a 30-minute version, though texture won’t be as silky. For a smoky twist, add ½ teaspoon smoked paprika when blending.
I keep a jar of this puree in my fridge at all times—it’s the ultimate pantry staple for vegan cooking. 🌱
Nutrition facts
Frequently asked questions
Can I use canned beans instead of dried for this puree?
Yes! For a quick version, use 2 (15-oz) cans of canned cannellini beans (drained and rinsed). Skip the soaking step, but you'll need to simmer them for 10-15 minutes to soften further. The texture won't be quite as silky, but it still works perfectly for soups and dips. Pro tip: Add 1-2 tablespoons of water while blending to help emulsify.
How do I fix a puree that's too thick or grainy?
For thickness, thin with 1-2 tablespoons of water or plant milk at a time until smooth. If it's grainy, blend again for 30-60 seconds with a splash of olive oil to help emulsify. Still grainy? Strain through a fine-mesh sieve for a silky finish. The key is proper soaking and cooking time—rushed beans cause grittiness.
What are the best ways to use this puree beyond soups?
This versatile puree works as a creamy pasta sauce (toss with garlic and olive oil), vegan cheese spread (mix with nutritional yeast and lemon), or dip base (add roasted garlic and smoked paprika). Stir it into mashed potatoes for extra protein, or use as a sandwich spread with mustard and herbs. The possibilities are endless for vegan cooking!
Can I make this puree without a high-speed blender?
Yes, but with extra effort! Use an immersion blender directly in the pot after cooking, adding 1/4 cup water at a time until smooth. For best results, strain through a fine-mesh sieve afterward. A regular blender works too, but you may need to scrape down sides frequently and add more liquid to prevent overheating. Patience is key!
How do I add extra flavor variations to this puree?
Try these easy twists: Roasted garlic (blend 2 extra roasted cloves), herbed (add 1 tbsp chopped parsley + 1 tsp dried thyme), or spicy (blend in 1/4 tsp chili flakes + 1/2 tsp cumin). For umami depth, stir in 1 tsp soy sauce or 1 tbsp miso paste when warming. Each variation keeps the puree's smooth texture while adding new dimensions.