
Desserts
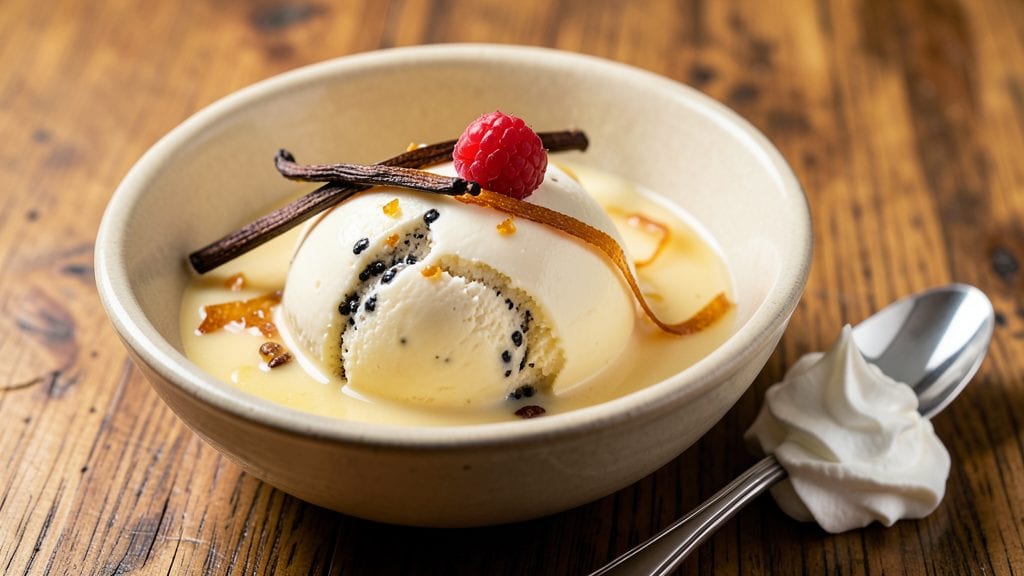
Creating old-fashioned vanilla bean ice cream that rivals artisanal shops starts with a simple but critical technique: slow-cooked custard infused with real vanilla bean. This recipe delivers the creamiest, most aromatic vanilla ice cream you'll ever make—no shortcuts, just traditional methods that transform basic ingredients into something extraordinary.
The secret lies in properly splitting the vanilla bean and simmering the custard until it reaches that perfect silky texture.
What sets this recipe apart is the attention to detail—from using whole vanilla beans instead of extract to carefully tempering the eggs to prevent scrambling. The custard base is rich yet light, with a velvety smoothness that comes from proper cooking and cooling techniques.
I've perfected this method over years of testing, ensuring every batch delivers that signature vanilla aroma and flavor that makes it worth the effort.
By the time you churn and freeze this ice cream, you'll have a dessert that's perfectly balanced—creamy yet firm, intensely vanilla-scented with those signature specks of vanilla bean throughout.
The texture is luxurious, the flavor is pure, and the process, while requiring patience, is straightforward once you understand the key steps. This is the kind of ice cream that makes people pause and say, "This tastes just like my grandmother used to make."
The beauty of this recipe is its versatility—you can infuse variations like bourbon or coffee into the custard before freezing, or keep it classic with just vanilla.
Whether you're serving it at a summer gathering or simply treating yourself to a homemade dessert, this method guarantees results that will impress even the most discerning palates. Let's get started on creating your perfect batch.
Ingredients for old fashioned vanilla bean ice cream
Real vanilla beans and slow-cooked custard transform basic ingredients into ice cream that tastes like nostalgia.
| Ingredient | Amount | Notes |
|---|---|---|
| Heavy Whipping Cream 🥛 | 2 cups | Full-fat for maximum creaminess |
| Whole Milk 🥛 | 1 ½ cups | Whole milk preferred for richness |
| Large Egg Yolks 🥚 | 8 whole | Fresh, room temperature |
| Granulated Sugar 🍚 | 1 ½ cups | Superfine preferred for smoothness |
| Vanilla Beans 🌿 | 2 whole | Madagascar or Tahitian preferred |
| Unsalted Butter 🧈 | ½ cup | Cold, cubed for custard |
| Diamond Crystal Kosher Salt 🧂 | ¼ tsp | Fine grain preferred |
| Pure Vanilla Extract 🍯 | 1 tsp | Optional, for extra depth |
| Heavy Cream 🥛 | 2 cups | Additional for churning |
Vanilla beans are the heart of this recipe—Madagascar or Tahitian are the gold standard, with Madagascar offering that classic bakery vanilla flavor. Costco or specialty grocers usually carry the best quality, often sold in bulk. Look for beans that are plump, moist, and dark brown with black specks—those are the seeds packed with flavor. Split them lengthwise before scraping out the seeds (save the pods for infusing!). If you can only find dried beans, soak them in warm milk for 30 minutes first to rehydrate. The heavy cream and whole milk? Full-fat versions only—this isn’t the time for skim milk shortcuts. Egg yolks should be fresh and room temperature, so take them out of the fridge 30 minutes before using.
No vanilla beans? Pure vanilla extract plus a pinch of xanthan gum (1/4 tsp) can mimic the texture, but you’ll miss those signature specks. Running short on butter? European-style butter adds more flavor, but regular unsalted works fine. The sugar should be superfine if possible—it dissolves better, giving you that silky texture. If you only have regular granulated, pulse it in a food processor first. For the custard, low and slow is key—constant stirring prevents scrambling. If you’re nervous about tempering the eggs, whisk the yolks with a splash of milk first, then slowly add the hot mixture. The vanilla extract? Only add it if you want extra depth—it’s not traditional but works in a pinch.
This custard needs at least 4 hours in the fridge before churning—don’t rush it. Store the finished ice cream in an airtight container with parchment between layers to prevent freezer burn. It’ll keep for up to 2 months in the freezer, though it’s best enjoyed within the first month. For serving, let it sit at room temperature for 5-10 minutes—it’ll be perfectly scoopable. Leftovers? Portion into small containers for quick treats. And if you’re feeling fancy, infuse the custard with a splash of bourbon or coffee before freezing for a gourmet twist.
Why You'll Love This Recipe
- No Fuss, Big Payoff: I swear by this—just a saucepan, a whisk, and 15 minutes of hands-off simmering. Those egg yolks and cream transform into something velvety without a single drop of stress.
- Vanilla That Stops You: The split beans infuse every spoonful with that deep, floral richness you’d pay $8 for at a café. Honestly, my first batch had me licking the bowl like a kid at a sundae stand.
- Weeknight to Party Fix: Same recipe feeds my family’s ice cream cravings midweek or impresses guests when I’m hosting. Freeze it in a loaf pan for perfect scoops, or serve it straight from the container—no judgment.
- Leftovers? More Like Leftovers: This recipe actually gives you leftovers—because you’ll want seconds. And the best part? The custard base keeps for days in the fridge, so I’m never scrambling for dessert.
Step-by-step instructions for old fashioned vanilla bean ice cream
This classic custard base delivers ice cream so rich and velvety it'll fool even the most discerning ice cream shop regulars.
Infuse the Vanilla Beans and Warm the Dairy
Split the 2 whole vanilla beans lengthwise and scrape out the seeds with the tip of a knife. Drop the seeds and empty pods into the 2 cups heavy whipping cream and 1.5 cups whole milk in a saucepan. Bring to a gentle simmer over medium heat—you'll see small bubbles forming at the edges but not a full boil. This low-and-slow approach prevents the cream from breaking.
Simmer for 10-12 minutes until the mixture reaches 160°F. The vanilla will release its aromatic oils, perfuming the cream with that signature vanilla depth. Here's the thing—if you rush this step, you'll end up with a watery, flavorless custard. Patience here ensures that rich vanilla flavor throughout every spoonful.
Temper the Egg Yolks with Sugar and Salt
While the dairy heats, whisk together the 8 whole large egg yolks, 1.5 cups granulated sugar, and 0.25 tsp diamond crystal kosher salt in a separate bowl until smooth and pale. This mixture should be thick and ribbon-like—almost like a thin batter. The sugar helps stabilize the eggs and prevents curdling when they meet the hot liquid.
Temper the eggs by slowly ladling the hot cream mixture into the yolks while whisking constantly. This gradual introduction prevents the eggs from scrambling. Once fully incorporated, pour the egg mixture back into the saucepan and return to low heat. Stir constantly with a wooden spoon or silicone spatula—you'll see the mixture thicken noticeably as it reaches 170°F.
Finish the Custard and Add Butter
Remove the saucepan from heat once the custard reaches 170°F and thickens enough to coat the back of a spoon. At this point, it should look like thick pudding. Stir in the 0.5 cup cold unsalted butter, cubed, until fully melted and incorporated. The butter adds luxurious richness and prevents ice crystals from forming later.
Let the custard cool to room temperature, then cover with plastic wrap pressed directly onto the surface. Refrigerate for at least 4 hours or overnight. This resting period allows flavors to meld completely and ensures a smooth texture. Pro tip: Skim off any hardened cream that rises to the top before churning—this keeps your ice cream ultra-smooth.
Churn the Ice Cream to Perfection
Pour the chilled custard into your ice cream maker and churn according to the manufacturer's instructions—typically 20-25 minutes. You'll know it's ready when it forms a thick, creamy texture that holds its shape when scooped. The ice cream should be soft-serve consistency at this stage.
Transfer to a lidded container and freeze for 4-6 hours until firm. For the best texture, let it sit at room temperature for 5-10 minutes before scooping. This resting period makes it easier to serve without getting ice crystals on your spoon. The result? Ice cream with a silky texture, intense vanilla flavor, and no grainy aftertaste—just like the old-fashioned ice cream shops used to make.
Pro Tips For Making Old Fashioned Vanilla Bean Ice Cream
- Scrape the Pot: After heating your egg yolk-sugar mixture, don’t just stir—scrape the bottom constantly. That’s where the magic happens, where the sugar dissolves and the custard thickens properly. I learned this the hard way when my first batch ended up grainy because I got distracted.
- Split the Vanilla: Cut one vanilla bean lengthwise and scrape out the seeds, then split the pod itself into 3-4 pieces. Toss half the pod pieces into the hot custard and reserve the rest for the ice cream base later—double the flavor without overpowering. (Yes, even if you’re impatient like me.)
- Chill Before Whipping: Let your chilled custard sit in the fridge for at least 4 hours—overnight is ideal—before whipping in the cream. Cold custard whips faster and holds its shape, while warm custard turns into butter faster than you can say “scoop.” Trust the process.
- Whisk the Cream Cold: Whip your heavy cream and milk mixture only when it’s ice-cold, straight from the fridge. Room-temperature cream folds in too easily and won’t give you that silky, stand-up texture. Pop it in the freezer for 10 minutes if it’s warm—it makes a real difference.
Common mistakes when making this dish
Overcooking the Custard
One of the biggest mistakes is letting the custard boil or overheat past 170°F. When the temperature climbs too high, the eggs scramble and create a grainy, rubbery texture that ruins the smoothness.
I’ve seen this happen when people walk away from the stove or don’t monitor the heat closely. Always use a candy or instant-read thermometer to track the temperature—it’s the only way to guarantee precision.
If you notice the custard starting to curdle or separate, immediately remove it from heat and whisk vigorously to try to salvage it. 🌡️
Skipping the Tempering Step
Adding hot cream directly to cold egg yolks is a recipe for disaster—it causes the eggs to scramble instantly, creating a lumpy, inedible mess. The key is to temper the eggs by slowly mixing in the hot cream while whisking constantly.
I recommend whisking the yolks with a splash of milk first, then gradually adding the hot mixture in a thin stream. This gradual process ensures the eggs heat up evenly without curdling.
If you’re in a rush, at least strain the custard through a fine-mesh sieve before churning to catch any potential lumps.
Not Cooling the Custard Properly
Rushing the cooling process leads to ice crystals and a grainy texture in your final ice cream. The custard must cool to room temperature before refrigerating, and it needs that 4-hour minimum in the fridge to fully set.
I’ve made this mistake when impatiently churning warm custard—it results in a product that’s icy and unpleasantly textured. For faster cooling, place the custard bowl in an ice bath while stirring gently, but never skip the full refrigeration step.
The resting period is what transforms a good custard into an extraordinary one.
Using Low-Quality Vanilla Beans
Not all vanilla beans are created equal, and using dried or low-grade beans will leave your ice cream tasting flat. I’ve tried cheaper beans from bulk bins, and the flavor is noticeably weaker. Invest in Madagascar or Tahitian vanilla beans—they’re the gold standard for their rich, complex flavor.
If your beans are dried out, soak them in warm milk for 30 minutes before scraping to rehydrate them. Pro tip: Save the empty pods after scraping—infuse them in the cream for even more depth of flavor.
The difference between a good bean and a great one is like night and day in your final product.
Churning Too Long or Too Short
Under-churning leaves your ice cream too soft and melty, while over-churning turns it into butter-like ice cream. The ideal time is 20-25 minutes in your ice cream maker, until it reaches a soft-serve consistency. I’ve ruined batches by leaving the machine running too long—it’s easy to do when you’re distracted.
If you’re unsure, test a spoonful: it should hold its shape but still be scoopable. For no-churn methods, ensure your custard is fully chilled and whipped to stiff peaks before freezing. The texture is everything, and getting it right makes all the difference.
Ignoring the Resting Period
Serving ice cream straight from the freezer is a cardinal sin—it’s rock-hard and full of ice crystals. Always let your ice cream sit at room temperature for 5-10 minutes before scooping. This resting period allows the texture to soften slightly, making it creamy and smooth.
I’ve seen people struggle with this, especially when serving to guests, but it’s a non-negotiable step. For large gatherings, portion the ice cream into individual containers and let them sit out for 10-15 minutes before serving. The difference in texture is immediate and noticeable. ✨
Nutrition facts
Frequently asked questions
Can I substitute vanilla extract for vanilla beans?
You can use 1 teaspoon pure vanilla extract plus 1/4 teaspoon xanthan gum to mimic the texture, but you'll miss those signature specks and deeper flavor notes. For the most authentic taste, always use whole vanilla beans—Madagascar or Tahitian deliver the richest aroma. If you're in a pinch, infuse the cream with a scraped vanilla bean pod for extra depth.
Why is my custard grainy after churning?
Graininess usually means your custard wasn't cooled properly or was overchurned. Always refrigerate the custard for at least 4 hours before churning, and never let it warm up during the process. If it happens, strain through a fine-mesh sieve before freezing to catch any ice crystals. The resting period is critical for silky texture!
How long can I store this ice cream?
This recipe keeps beautifully for up to 2 months in an airtight container with parchment between layers. For best quality, enjoy within the first month. If you notice ice crystals forming, let it sit at room temperature for 10-15 minutes before serving to restore creaminess. The flavor actually improves slightly as it ages!
Can I make this without an ice cream maker?
Yes! Chill the custard completely, then whip 2 cups heavy cream to stiff peaks and fold it in. Freeze in a shallow container, stirring every 30 minutes for the first 3 hours. This "no-churn" method works but requires more attention to texture. The ice cream will be slightly icier but still delicious.
What's the secret to ultra-smooth texture?
The key is proper cooling and resting. After cooking, let the custard cool to room temperature, then refrigerate for 4+ hours. Skim off any hardened cream before churning, and use a thermometer to ensure you never exceed 170°F during cooking. These steps eliminate ice crystals and create that velvety shop-quality finish!