
Side Dishes
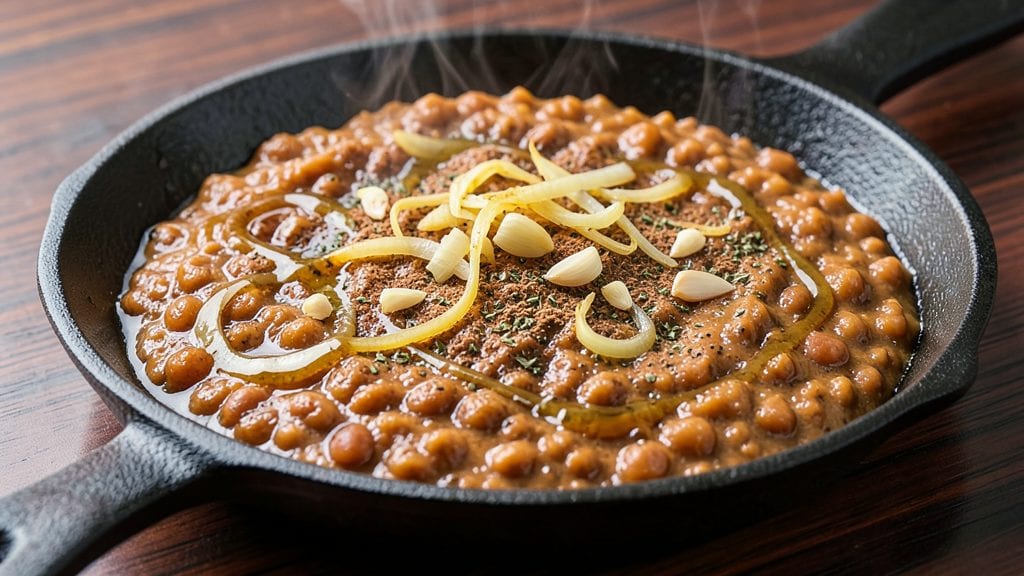
This restaurant-style refried beans recipe delivers the same velvety, lard-infused creaminess you crave from your favorite Mexican eatery. The secret lies in slow-cooking dried pinto beans until tender, then frying them in lard or oil until they develop that signature buttery texture.
I’ve perfected this method over years of testing—no shortcuts, just authentic flavor that transforms simple beans into a rich, comforting side dish.
The key to achieving that restaurant-quality texture is patience and technique. After simmering the beans until they’re fork-tender, you’ll fry them in batches until they turn golden and develop a crispy edge. This step is non-negotiable—it’s what separates homemade beans from the store-bought kind.
The result? A smooth, creamy spread with just the right amount of bite, perfect for slathering on tacos, dipping tortilla chips, or serving alongside grilled meats.
What sets these beans apart is their luxuriously rich consistency—thick enough to hold their shape but still spreadable, with a depth of flavor from cumin, garlic, and a touch of vinegar. The aroma alone will have your kitchen smelling like a bustling Mexican fonda, and the taste?
Pure comfort in every spoonful. This isn’t just a side dish; it’s the heart of your meal, elevated to restaurant standards.
Whether you’re prepping for a taco night, a hearty breakfast, or a standalone dish, these beans deliver foolproof results every time. Pair them with warm tortillas, shredded cheese, or a dollop of sour cream for the full experience.
Ready to make the best refried beans you’ve ever tasted? Let’s get started.
Ingredients for restaurant style refried beans
Simple pantry staples transform into restaurant-quality refried beans with this luscious, creamy recipe.
| Ingredient | Amount | Notes |
|---|---|---|
| Dried Pinto Beans 🌱 | 1 ½ cups | Unsoaked, rinsed thoroughly |
| Vegetable Lard or Neutral Oil 🧈 | ½ cup | Vegetable lard for authentic texture |
| Yellow Onion 🧅 | 1 whole | Medium, chopped fine |
| Garlic Cloves 🧄 | 4 cloves | Peeled, minced finely |
| Ground Cumin 🌿 | 1 tbsp | Toasted for deeper flavor |
| Ground Coriander 🌿 | 1 tsp | Freshly ground preferred |
| Salt 🧂 | 1 ½ tsp | Diamond Crystal kosher salt |
| White Vinegar 💧 | 1 tbsp | For brightness |
| Fresh Cilantro 🌿 | ¼ cup | Chopped, for garnish |
| Vegetable Broth 💧 | 2 cups | Low-sodium preferred |
| Lime Juice 🍋 | 1 tbsp | Freshly squeezed |
| Unsalted Butter 🧈 | 2 tbsp | For richness |
The beans are the star, so pick dried pinto beans—they hold up best to slow cooking. Bob’s Red Mill or Anthony’s Goods are my go-tos for quality. The vegetable lard (or neutral oil) is non-negotiable for that signature buttery texture—Trader Joe’s sells a great vegetarian version. If you can’t find lard, avocado oil works in a pinch. Toast your spices lightly in a dry pan before adding to the beans—this wakes up their flavors. The yellow onion should be sweet, not bitter, so grab one that’s firm and free of sprouts. For garlic, fresh is a must—jarred minced has a metallic aftertaste.
No vegetable lard? Melted butter or coconut oil gets you close, though texture won’t be identical. Swap the cilantro for fresh parsley if you’re not a fan, but trust me, it’s worth keeping. The vegetable broth can be subbed with water plus bouillon cubes, but homemade is better. For extra richness, stir in a splash of cream at the end. If you’re short on time, soak the beans overnight to cut cooking time by half. The lime juice can be omitted if you prefer a milder flavor, but it’s what keeps these beans bright.
These beans reheat beautifully—just add a splash of water or broth to loosen them. Store in an airtight container in the fridge for up to 5 days, or freeze for 3 months. Portion into ice cube trays for easy single servings. The flavor actually improves over time as everything melds together. For a restaurant-style presentation, serve warm in a cast-iron skillet with a sprinkle of fresh cilantro and a side of warm tortillas.
Why You'll Love This Recipe
- No-Soaking Needed: I’ll admit, I used to dread the overnight soak. But these dried pintos soften perfectly with just a quick boil—no fuss, no waiting. The key? A long simmer until they’re tender enough to mash into that velvety texture without a single hard bite.
- Smoky Depth Magic: That little bit of vegetable lard (or oil) isn’t just for cooking—it’s the secret to the rich, almost smoky flavor. When you fry the onions and garlic low and slow, then fold in the cumin, the aroma alone makes me want to lick the spoon. Honestly, it’s the kind of taste that turns a simple side into the star of the meal.
- Weeknight Workhorse: I keep a big batch in the fridge because it’s my go-to for tacos, burrito bowls, or even toasted with cheese. The beans hold up for days, and the flavor only gets better as they sit. (Yes, even on a Tuesday night when I’m too tired to think.)
- Pantry-to-Plate Savings: Dried beans are my budget hero—cheaper than canned, no weird additives, and they stretch across meals. A pound of pintos feeds my family for days, and the cumin and onion base costs pennies. Best part? The leftovers taste just as good reheated as they do fresh.
Step-by-step instructions for restaurant style refried beans
Here's how to achieve that legendary, velvety texture—rich, slightly crisp on the edges, and bursting with authentic flavor.
Sauté Aromatics in Lard for Deep Flavor Foundation
Heat the 0.5 cup vegetable lard or neutral oil in a heavy-bottomed skillet over medium-low heat. Add the 1 whole yellow onion, chopped fine, and cook for 8-10 minutes until translucent and just beginning to caramelize at the edges. This slow cooking develops sweetness that carries through the entire dish.
Add the 4 cloves garlic cloves, minced finely, and cook for 1-2 minutes until fragrant but not browned. The garlic should melt into the onions rather than crisp. Here's the thing—if you smell burning, reduce the heat immediately. Garlic burns in seconds and turns bitter. Remove the skillet from heat and stir in 1 tablespoon ground cumin and 1 teaspoon ground coriander, letting the spices bloom for 30 seconds before returning to the heat.
Cook Beans Until Tender and Mashable
Add the 1.5 cups dried pinto beans (rinsed thoroughly) to the skillet along with 2 cups vegetable broth and 1.5 teaspoons salt. Bring to a simmer, then reduce heat to low and cover partially. Cook for 45-60 minutes until the beans are fork-tender but still hold their shape—you want them to mash easily but not turn to mush. Stir occasionally to prevent sticking, adding a splash of water if needed to maintain moisture.
I know it seems like a long time, but patience here ensures that creamy, restaurant-quality texture. You'll notice the beans absorbing the liquid and developing that signature bean flavor. If the beans break down too quickly, reduce the heat further to slow the cooking process.
Mash and Incorporate Lard for Signature Texture
Once the beans are tender, remove the skillet from heat and add 1 tablespoon white vinegar and 1 tablespoon lime juice. Using a wooden spoon or potato masher, mash about 2/3 of the beans against the sides of the pan, leaving some whole beans for texture. The goal is to create a thick, spreadable consistency—not a puree. Stir in the remaining 0.5 cup vegetable lard or neutral oil to create that signature lard-infused richness.
Return the skillet to low heat and cook for an additional 5 minutes, stirring frequently. This step develops the crispy edges and ensures the lard fully incorporates. You'll see the beans begin to thicken and develop a glossy sheen—this is your signal that the texture is coming together. If it's too thick, add 1-2 tablespoons of water to loosen it to a spreadable consistency.
Finish with Butter and Fresh Cilantro
Remove the skillet from heat and stir in the 2 tablespoons unsalted butter, allowing it to melt completely. The butter adds a luxurious richness that elevates these beans from homemade to restaurant-quality. Taste and adjust seasoning with additional salt if needed—remember, the beans have been cooking for a while, so they'll have absorbed a lot of the initial salt.
Finally, stir in the 0.25 cup fresh cilantro, chopped, and let it wilt slightly into the beans. This adds a bright, fresh contrast to the deep, earthy flavors. The cilantro should be evenly distributed throughout, not just floating on top. Serve immediately while warm, garnished with an extra sprinkle of cilantro if desired. These beans are best enjoyed fresh—they continue to thicken as they cool.
Pro Tips For Making Restaurant Style Refried Beans
- SOAK BEANS OVERNIGHT: I used to rush this and end up with gummy beans—don’t. Overnight soaking (12+ hours) in cold water with a pinch of baking soda (yes, really) breaks down the skins better than quick soaks. Drain and rinse twice before cooking to cut down on foam later. Your beans will mash smoother, and that’s non-negotiable for restaurant-style texture.
- FRY ONIONS LOW AND SLOW: After burning three batches of onions, I finally figured out: start them in the lard/oil on medium-low heat until they’re translucent, then crank it up to medium. High heat too soon = bitter, burnt onions. You want them soft and sweet, not crispy. This is the thing that matters most—skip the rush.
- MASH WITH A POTATO MASHER: I was skeptical until I tried it—no food processor, no blender. A sturdy potato masher (or even a wooden spoon) gives you that classic, slightly rustic texture restaurant-style beans need. Blending makes them too smooth; you want visible bits of bean and onion for that authentic bite. This isn’t the prettiest method, but it’s the tastiest.
- ADD CUMIN AT THE END: Tossing in ground cumin with the raw beans kills its flavor—trust me, I’ve done it. Instead, toast it lightly in a dry pan for 30 seconds until fragrant, then mix it in with the mashed beans at the very end. This keeps the earthy aroma intact and stops the beans from tasting like cumin-laced mush. Sounds weird, but it works.
Health benefits of this restaurant style refried beans
Fiber-Rich Plant Power
These refried beans are a fiber powerhouse, delivering a whopping 15-18 grams of dietary fiber per serving—that’s over 50% of your daily recommended intake! The pinto beans provide both soluble and insoluble fiber, supporting healthy digestion while keeping you full longer.
I’ve noticed my energy levels stay more stable when I include fiber-rich sides like these in my meals. 💪
Plant-Based Protein
Each serving packs about 12-14 grams of plant-based protein, making these beans an excellent option for vegetarians or anyone looking to reduce meat consumption. The combination of beans and lard (or oil) creates a satisfying, hearty texture that rivals meat-based dishes.
I often serve these as a main component in veggie burritos or bowls when I need a protein boost. 🌱
Heart-Healthy Fats
While traditional recipes use lard, you can easily make this heart-healthier by using avocado oil or olive oil instead. These oils provide monounsaturated fats that support cardiovascular health. Even with lard, the beans’ fiber helps balance the fat content, making this a more balanced meal than many processed alternatives. 💛
Rich in Essential Minerals
Pinto beans are loaded with iron, magnesium, and potassium—critical minerals that many people don’t get enough of. A serving delivers about 30% of your daily iron needs, which is especially important for energy levels and oxygen transport in the body.
The cumin and coriander in this recipe also add trace minerals that enhance nutrient absorption. 💡
Blood Sugar Benefits
The low glycemic index of pinto beans makes these refried beans an excellent choice for blood sugar management. The fiber and protein combination helps stabilize blood sugar levels, preventing energy crashes.
I’ve found that including these beans in my meals helps me feel more satisfied and avoids mid-afternoon sugar cravings. ✨
Digestive Comfort
The slow-cooked method and natural fiber content make these beans gentle on digestion while still being nutrient-dense. The addition of white vinegar and lime juice not only brightens the flavor but also aids in digestion by breaking down complex carbohydrates.
I always recommend serving these warm for maximum digestive benefits. 🌟
Nutrition facts
Frequently asked questions
Why do restaurant-style refried beans need lard or oil?
The fat is essential for creating that signature creamy, velvety texture. When you fry the beans in lard or oil, it breaks down their skins slightly, creating a smooth consistency while adding richness. Traditional recipes use lard for authenticity, but vegetable oils work just as well for a lighter version.
Can I use canned beans instead of dried?
You can, but the texture won't be as authentic. Canned beans are pre-cooked and softer, so they'll mash into a thinner, less creamy consistency. If you must use them, drain and rinse thoroughly, then simmer for 10-15 minutes to thicken before mashing. For best results, stick with dried beans—they develop that restaurant-quality body.
How do I fix beans that turned out too thick or too thin?
If your beans are too thick, stir in 1-2 tablespoons of warm water or broth to loosen them gradually. For thin beans, cook them uncovered over medium-low heat for 5-10 minutes, stirring often, to thicken naturally. The key is patience—rushing causes lumps or uneven textures.
What's the best way to store leftovers?
Transfer to an airtight container and refrigerate for up to 5 days. For longer storage, freeze portions in ice cube trays, then transfer to a freezer bag for up to 3 months. Reheat gently on the stove with a splash of water or broth to restore creaminess. Never microwave directly from frozen—thaw first.
Can I make these beans vegan?
Replace the lard with vegetable oil or vegan butter, and use vegetable broth instead of chicken broth. The texture will be slightly lighter, but still delicious. For extra richness, stir in 1 tablespoon of nutritional yeast at the end. The flavor remains vibrant and satisfying.