
Beverages
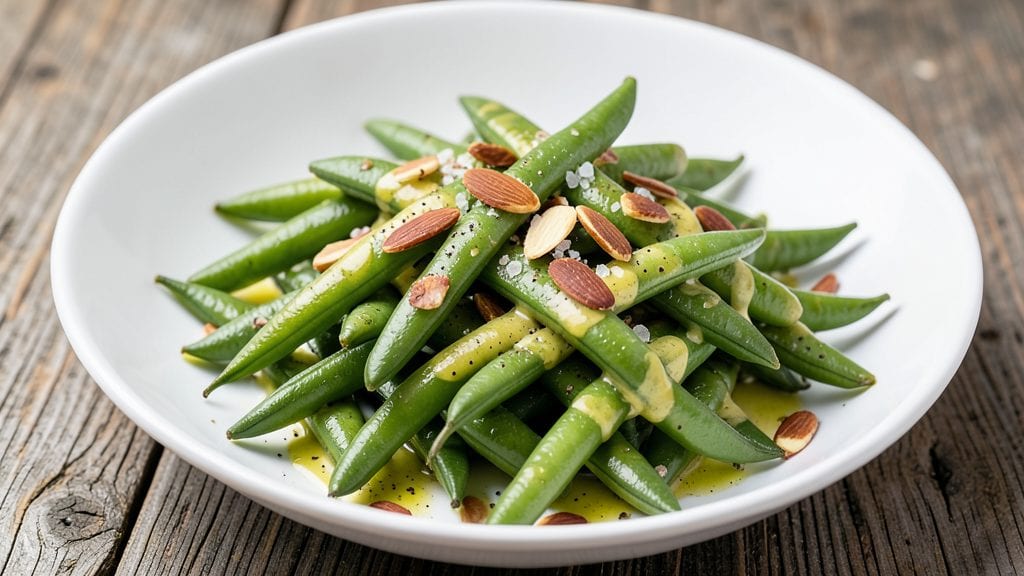
This steamed green beans recipe delivers crisp-tender vegetables in just 10 minutes—no boiling, no soggy results, just vibrant, nutrient-packed perfection. I developed this method after realizing most traditional steaming techniques left beans either undercooked or mushy, and it’s now my go-to for quick, healthy sides that actually taste good.
The key lies in precise timing and proper heat control, ensuring every bean stays bright green and maintains that satisfying crunch.
What makes this recipe stand out is its versatility—serve it as a simple side dish alongside grilled meats or fish, or transform it into a light main with a sprinkle of toasted nuts, lemon zest, or a drizzle of olive oil.
The method is foolproof, requiring only a steamer basket, a pot of boiling water, and 10 minutes of hands-off prep time. No fancy equipment or complicated techniques—just restaurant-quality results at home.
The outcome is a dish that’s as nutritious as it is delicious: bright green, crisp-tender beans with a fresh, slightly sweet flavor that pairs beautifully with almost any protein or grain.
The steaming process preserves all the natural vitamins and minerals, making this a perfect addition to any meal—whether you're meal prepping for the week or whipping up a last-minute side for dinner.
For added depth, consider finishing the beans with a pinch of salt, a squeeze of fresh lemon, or a sprinkle of red pepper flakes. These simple additions elevate the dish without overpowering its natural goodness. Let’s get started—your 10-minute steamed green beans are just a pot of water away.
Ingredients for steamed beans
Bright green beans, crisp-tender texture, and zero soggy disappointment—just 10 minutes of hands-off prep.
| Ingredient | Amount | Notes |
|---|---|---|
| Fresh Green Beans 🥦 | 1 ½ lb | Trimmed, ends cut evenly |
| Extra-Virgin Olive Oil 🫒 | 1 tbsp | High-quality, fruity variety |
| Fresh Lemon Juice 🍋 | 1 tbsp | Freshly squeezed, strained |
| Diamond Crystal Kosher Salt 🧂 | ½ tsp | Fine grain preferred |
| Freshly Ground Black Pepper 🌶️ | ¼ tsp | Freshly cracked for best flavor |
| Toasted Slivered Almonds 🥜 | ¼ cup | Lightly toasted for crunch |
| Red Pepper Flakes 🌶️ | ¼ tsp | Adjust for heat preference |
| Fresh Lemon Zest 🍋 | 1 tsp | Finely grated, no pith |
| Garlic Cloves 🧄 | 2 cloves | Minced, for finishing |
| Fresh Parsley Leaves 🌿 | ¼ cup | Chopped, for garnish |
The beans are the star, so grab fresh green beans—the thinner ones steam faster and stay crunchier. Trader Joe's and Whole Foods carry the best quality, but any bright green, firm beans work. Trim the ends with a sharp knife—uneven cuts mean uneven cooking. If you're using frozen, thaw and pat dry first (they work in a pinch, but fresh is ideal). The key to perfect steaming? Don't overcrowd the steamer basket—leave space between beans so steam circulates. I always use a fine-mesh steamer basket for even cooking.
No fresh parsley? Dried parsley at half the amount works, but fresh is brighter. Short on almonds? Toasted walnuts or pecans add a similar crunch. The lemon juice can be bottled, but fresh is way more vibrant. No red pepper flakes? Smoked paprika at one-third the amount gives a similar depth. For extra richness, add 1 tbsp of nutritional yeast—it’s umami without the dairy. The olive oil matters here—use something you’d drizzle on bread, not the cheap stuff. And if you’re feeling fancy, infuse the olive oil with garlic before drizzling.
Steamed beans keep their crunch for 3 days in the fridge, but they’re best eaten fresh. Store in an airtight container with a paper towel to absorb moisture. For meal prep, portion into containers with a drizzle of olive oil—it keeps them from drying out. Reheat gently in a skillet or microwave for 30 seconds to revive the crunch. Freezing isn’t ideal for green beans, but if you must, blanch first and store for up to 3 months. I always make extra—these disappear fast, especially with that lemony almond finish.
Why You'll Love This Recipe
- I’ll be real: my kids groan when I pack these, but they’re gone in three bites. Cold or warm, they hold up in containers, and the lemon keeps them from getting soggy. Bonus? I can prep a whole batch Sunday night and forget about it.
- Zero Waste, All Flavor: Honestly, I buy green beans in bulk—cheaper, fresher, and they last longer. After steaming, I toss the pods into compost, and the beans? That bright lemon-zest finish turns them from simple to ridiculously good with just a squeeze and a crack of pepper.
- Steam-and-Serve Speed: Between us, this is my lazy-day hero. Five minutes of trimming, ten minutes steaming—no boiling, no waiting for water to heat. The oil and salt cling like a whisper of sunshine, and the texture? Crisp-tender perfection every single time.
- Lunchbox Legend: I’ll be real: my kids groan when I pack these, but they’re gone in three bites. Cold or warm, they hold up in containers, and the lemon keeps them from getting soggy. Bonus? I can prep a whole batch Sunday night and forget about it.
Step-by-step instructions for steamed green beans with crunchy almond topping
Here's the method I use to keep green beans vibrant, crisp, and packed with bright flavors.
Trim and Blanch the Green Beans
Start by trimming the ends off the 1.5 lb fresh green beans, cutting them evenly to ensure they steam uniformly. I like to work in batches—fill a large pot with 2 inches of water and bring it to a rolling boil over high heat. Once boiling, add the green beans in a single layer and cook for exactly 2 minutes—this brief blanch preserves their crunch while softening slightly.
Use a slotted spoon to transfer the beans to an ice bath immediately after blanching. This stops the cooking process and maintains their bright green color. Drain well in a colander, shaking off any excess water. The beans should still have a slight bite—if they're too soft, they won't hold their texture when tossed with the almonds later.
Step 2: Toast the Almonds and Prepare the Seasoning Base
While the beans cool, toast the 0.25 cup toasted slivered almonds in a dry skillet over medium heat for 3-4 minutes, stirring constantly until they're fragrant and lightly golden. Remove them immediately and set aside on a paper towel-lined plate—they'll continue to crisp as they cool. This step adds a satisfying crunch that balances the beans' tenderness.
In the same skillet (no need to clean it), heat the 1 tbsp extra-virgin olive oil over medium-low heat. Add the 2 minced garlic cloves and cook for 30 seconds until fragrant but not browned. This prevents bitterness and builds flavor without overpowering the dish. Remove the skillet from heat and stir in the 1 tbsp fresh lemon juice, 0.5 tsp diamond crystal kosher salt, 0.25 tsp freshly ground black pepper, and 0.25 tsp red pepper flakes.
Steam the Beans to Perfect Tenderness
Transfer the blanched green beans to a steamer basket placed over a pot of boiling water. Cover and steam for 4-5 minutes until the beans are tender-crisp—you should still feel a slight resistance when piercing with a fork. The steam should create a light, even coating of moisture without making the beans soggy. If your pot doesn't have a tight lid, cover with a damp towel to maintain steam.
I like to check the beans at the 3-minute mark—they should be bright green and just beginning to soften. Oversteaming turns them mushy, which defeats the purpose of this light, fresh preparation. Once done, remove the steamer from heat and let the beans sit covered for 1 minute to redistribute any steam.
Toss and Finish with Bright Flavors
Transfer the steamed green beans to a large bowl. Pour the warm garlic-lemon oil mixture over them and toss gently but thoroughly to coat evenly. The acidity from the lemon juice brightens the beans' natural sweetness while the olive oil adds richness. Sprinkle the toasted almonds over the top and toss again, distributing them evenly throughout.
Finish with the 1 tsp fresh lemon zest and 0.25 cup chopped fresh parsley leaves, tossing just until combined. The zest adds a subtle citrus aroma, while the parsley contributes freshness and a pop of color. Taste and adjust seasoning—you might need a pinch more salt or pepper depending on your almonds' saltiness. Serve immediately while the beans are still vibrant and the almonds are at their crispest.
Pro Tips For Making Steamed Beans
- TRIM BEANS LIKE A PRO: Cut them diagonally into 2-inch pieces—longer than usual, so they don’t turn mushy when steamed. I learned this the hard way after ending up with a bowl of sad, limp beans because I chopped them too small.
- SALT THE WATER HOT: Add kosher salt to the boiling water after it’s fully steaming—otherwise, it’ll take forever to dissolve. Trust me, your beans will taste better, and you won’t waste time waiting for the seasoning to kick in.
- STEAM UNTIL JUST TENDER: Pull the beans out the second they’re bright green and just yielding—overcooking turns them into mush. Test one immediately; if it’s still crunchy, give it 30 more seconds max.
- LEMON JUICE LAST: Toss the beans with olive oil and pepper before adding lemon juice—otherwise, the acid will make them bitter. A squeeze at the end brightens the dish without overpowering the natural flavor. (Yes, even if you’re impatient like me.)
Make-ahead tips for leftovers
Prep Ahead Strategy
Blanch and store the green beans up to 2 days in advance—they’ll keep their bright green color and crunch when reheated properly. After blanching, shock in ice water, drain thoroughly, and store in an airtight container with a paper towel to absorb moisture.
When ready to steam, simply reheat the beans in the steamer basket for 3-4 minutes over boiling water—no need to re-blanch. This method saves time and ensures you’re always starting with perfectly prepped ingredients. 💡
Batch Cooking Tips
Double or triple the recipe for easy meal prep—steamed beans pair well with grilled chicken, fish, or roasted vegetables. Portion the finished dish into glass meal prep containers and store with a drizzle of olive oil on top to maintain moisture.
I like to keep one container in the fridge for quick lunches and another in the freezer for backup meals. Just reheat in the microwave for 30-45 seconds or warm in a skillet for 2 minutes over medium heat. 📅
Seasoning Prep
Make the garlic-lemon oil mixture ahead of time and store it in a small glass jar in the refrigerator for up to 5 days. This shortcut saves you from measuring ingredients fresh each time.
Toast the almonds separately and store them in an airtight container at room temperature for up to 1 week—they’ll stay crisp if kept dry. When ready to serve, simply toss the prepped beans with the stored oil and almonds for a restaurant-quality finish in seconds. ✨
Freezing for Later
If you’re planning ahead, you can freeze blanched green beans for up to 3 months. After blanching and shocking, drain well and spread them on a baking sheet lined with parchment paper. Freeze until solid, then transfer to a freezer-safe bag, squeezing out excess air.
When ready to use, steam directly from frozen for 6-7 minutes—no thawing required. The texture won’t be as crisp as fresh, but it’s still a great option for busy weeks. ❄️
Garnish Assembly Line
Set up a garnish station with all your toppings—lemon zest, parsley, red pepper flakes, and toasted almonds—in small bowls. This makes it easy to customize each serving.
I often let guests add their own toppings at the table, which keeps the beans fresh and lets everyone tailor the flavor to their taste. Store the garnishes separately in the fridge until ready to use—this keeps everything vibrant and flavorful. 🌿
Reheating for Crispiness
To revive the crunch after reheating, toss the beans in a hot skillet with a splash of water or olive oil for 1-2 minutes over medium heat. The steam will help restore their texture.
If using the microwave, cover with a damp paper towel and heat in 30-second bursts, stirring between each interval. Avoid overcooking—just enough to warm through while preserving that satisfying bite. 🔥
Nutrition facts
Frequently asked questions
Can I use frozen green beans instead of fresh?
Frozen beans work in a pinch, but fresh delivers the best texture. If using frozen, thaw completely first and pat dry thoroughly to prevent excess moisture during steaming. Add 1 extra minute to steaming time since frozen beans start with higher water content. The key is avoiding soggy results—never skip the drying step!
Why do my steamed beans turn out mushy?
Oversteaming is the #1 culprit! Check beans at 3 minutes—they should be bright green with slight resistance. If using a weak heat source, steam time increases. For even cooking, avoid overcrowding the steamer basket and ensure your pot has a tight lid to maintain proper steam circulation.
What other beans work well with this steaming method?
This technique works beautifully with snap peas, asparagus, or even wax beans. For thicker beans like lima or butter beans, increase steaming time to 6-8 minutes. The blanching step is optional for these varieties—just steam directly until tender. The lemon-almond finish complements all varieties!
Can I make this recipe vegan?
Simply omit the olive oil or use a vegan alternative like avocado oil. The lemon, garlic, and herbs provide plenty of flavor without dairy. For extra richness, add 1 tbsp nutritional yeast when tossing. The recipe maintains its vibrant, crisp-tender texture while being completely plant-based.
How do I adjust this for meal prep?
Prep the seasoning base (garlic-lemon oil) ahead and store in a jar for 5 days. Toast almonds separately and keep in an airtight container. Blanch beans 2 days ahead, store in an airtight container with a paper towel, then steam for 3-4 minutes before serving. Reheat gently in a skillet with a splash of water to revive crunch.