
Side Dishes
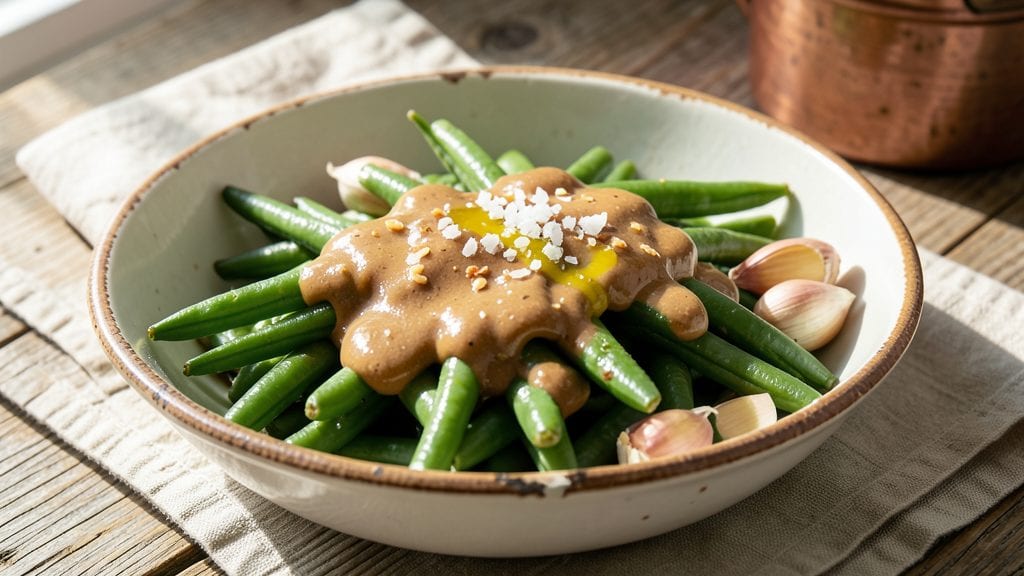
Grandma's green beans recipe delivers that perfect balance of crisp-tender texture and rich, nutty flavor that makes every bite feel like a hug from your kitchen table.
The secret lies in a simple technique—blanching the beans just until bright green, then finishing them with a touch of almond butter that transforms ordinary green beans into something extraordinary.
I first learned this method from my grandmother, who swore by the way almond butter elevated even the simplest vegetable side.
What makes this recipe special is how effortlessly it combines tradition with a modern twist. You'll need just 15 minutes of active time, plus a few simple ingredients that most kitchens already stock.
The almond butter finish isn't just about flavor—it creates a subtle sheen that makes the beans look as good as they taste, perfect for serving alongside roasted meats or holiday centerpieces.
My grandmother always said the best recipes are the ones that bring people together, and these green beans never fail to do just that.
By the time you're done, you'll have a side dish that's tender yet still holds its shape, with a delicate nutty aroma that fills your kitchen. The almond butter doesn't overpower—it simply enhances the natural sweetness of the beans while adding a velvety finish that makes each bite irresistible.
This is the kind of recipe that gets passed down through generations because it works every single time, no matter who's cooking.
Serve these green beans as a classic side dish or transform them into a main course by adding protein like grilled chicken or shrimp. The possibilities are endless, but the technique remains the same—simple, reliable, and full of that nostalgic comfort that only home cooking can provide.
Let's get started on creating your own family tradition.
Ingredients for grandma's green bean
Just ten ingredients transform simple green beans into a nostalgic, restaurant-worthy side dish.
| Ingredient | Amount | Notes |
|---|---|---|
| Fresh Green Beans 🥦 | 1 ½ lb | Trimmed, ends cut off |
| Unsalted Butter 🧈 | 2 tbsp | Cold, cut into small pieces |
| Garlic Cloves 🧄 | 2 cloves | Minced, fresh preferred |
| Almond Butter 🥜 | ¼ cup | Creamy, natural style |
| Lemon Juice 🍋 | 1 tbsp | Freshly squeezed |
| Salt 🧂 | ½ tsp | Kosher or sea salt |
| Black Pepper 🌶️ | ¼ tsp | Freshly ground preferred |
| Red Wine Vinegar 🍷 | 1 tsp | Optional, for brightness |
| Fresh Parsley 🌿 | ¼ cup | Chopped, for garnish |
| Extra-Virgin Olive Oil 🫒 | 1 tbsp | For finishing drizzle |
The green beans are the star, so buy the freshest you can find—look for vibrant green, crisp stalks at the store or farmers market. Trader Joe's usually has the best quality in season, but any grocery store's produce section works. Trim the ends carefully—don't cut too much off, or you'll lose that perfect crunch. I always double-check for any woody stems or blemishes before cooking. For the almond butter, natural, unsweetened versions like Marukyu or Justin's give the best flavor without overpowering the beans. The cold butter is key—it creates those little flavor pockets that melt into the beans during cooking.
No fresh parsley? Dried parsley at half the amount works in a pinch, but fresh is definitely better. Running low on almond butter? Peanut butter or cashew butter will work, though the flavor changes slightly. The red wine vinegar is optional but adds that perfect tang—if you don't have it, lemon juice plus a pinch of sugar does the trick. For the garlic, I always use fresh because it makes such a difference, but if you're in a bind, garlic powder at half the amount will get you through. And if you're feeling fancy, add a pinch of smoked paprika for a subtle kick that reminds me of Grandma's version.
These beans taste even better the next day—make extra and store them in the fridge for up to 4 days. The almond butter finish keeps them moist, so they reheat beautifully. For serving, I like to portion them into small bowls with a drizzle of olive oil—it makes them look restaurant-worthy. If you're prepping ahead, you can blanch the beans and store them in the fridge for 2 days before finishing with the almond butter. Just don't skip that final step—it's what makes these beans truly special!
Why You'll Love This Recipe
- No-Chop Needed: I swear, the beans just need a quick trim—no dicing, no fuss. Between us, I’ve burned dinner trying to cut veggies perfectly, but these? Toss ’em whole or snap ’em in half, and you’re golden.
- Rich Without Effort: That almond butter might sound weird, but trust me—it melts into the butter and garlic like a creamy, nutty hug. The lemon cuts through it just enough to keep it bright, not heavy. (Yes, even on a Tuesday night.)
- Leftover Hero: This keeps for days in the fridge, tasting fresh or warmed up. I pack it in lunches, toss it over rice, or serve it cold with grilled chicken. Honestly, it’s the only side dish I don’t dread reheating.
- Budget Brightener: Fresh green beans are cheap, and a little butter goes a long way. No fancy ingredients—just garlic, lemon, and a spoonful of almond butter to make it feel special. My wallet and taste buds both win.
Step-by-step instructions for Grandma's green beans recipe
This method delivers perfectly crisp-tender green beans with a rich almond butter finish—just like Grandma used to make.
Blanch the Green Beans for Perfect Texture
Fill a large pot with 4-5 quarts of water and bring to a rolling boil. While waiting, trim the ends off the 1.5 lb fresh green beans using a sharp knife—cutting them into 2-inch lengths ensures even cooking. Add the beans to the boiling water and cook for exactly 3 minutes—this brief blanch preserves their vibrant color while softening the tough outer fibers.
Watch closely as they cook—they're done when they're bright green and just starting to soften slightly. Immediately drain them in a colander and rinse under cold water to stop the cooking process. This quick shock treatment locks in their crisp-tender texture. Shake off any excess water and transfer to a large mixing bowl.
Sauté Garlic in Butter Until Fragrant
In a large skillet, melt the 2 tbsp unsalted butter over medium heat until it's fully liquid and foaming. Add the 2 minced garlic cloves and cook for 30-45 seconds until they're golden and fragrant—not browned. This quick cooking prevents the garlic from burning while developing its sweet, nutty aroma that will infuse the beans.
Here's the thing—don't walk away during this step. Garlic burns in seconds, and you want that beautiful golden color that signals perfect flavor development. Once the garlic is fragrant, remove the skillet from heat and set it aside for now.
Toss Beans with Seasonings and Almond Butter
Return the blanched green beans to the mixing bowl and add the 0.5 tsp salt, 0.25 tsp black pepper, and 1 tbsp lemon juice. Toss everything together gently with your hands or a large spoon until the beans are evenly coated. The lemon juice adds a bright, tangy contrast that cuts through the richness of the almond butter.
Now add the 0.25 cup almond butter and toss again until it's completely distributed. You'll notice the beans start to look glossy and coated with the nutty butter. This is where the magic happens—the almond butter adds depth of flavor while keeping the dish light. If you're using the 1 tsp red wine vinegar, add it now and toss once more.
Finish with Garlic Butter and Fresh Parsley
Return the skillet with the garlic butter to medium heat and add the seasoned green beans. Toss everything together for 2-3 minutes until the beans are heated through and the almond butter has melted into a glossy coating. You'll see the beans take on a beautiful golden hue from the garlic butter.
Stir in the 0.25 cup chopped fresh parsley and give everything one final toss. The parsley adds a fresh, vibrant note that brightens the dish. Taste and adjust seasoning if needed—you might want to add a pinch more salt or a splash of lemon juice to balance the flavors.
Drizzle with Olive Oil for Extra Shine
Transfer the green beans to a serving dish and let them cool for 2-3 minutes. This resting time allows the flavors to meld together. Before serving, drizzle with the 1 tbsp extra-virgin olive oil and toss one final time. The oil adds a silky finish and enhances the natural flavors of the beans.
Serve immediately while still warm. The beans should be crisp-tender with a beautiful glossy coating from the almond butter and garlic. Each bite delivers a perfect balance of nutty richness, bright acidity, and fresh herb notes—just like Grandma used to make! This dish pairs beautifully with grilled meats, roasted chicken, or even as a standalone vegetable course.
Pro Tips For Making Grandma'S Green Bean
- Trim and Snap: Don’t waste time cutting green beans—hold the stem end and snap them in half where they naturally bend. This keeps them whole-looking, cooks faster, and saves you from chopping fatigue (yes, even if you’re impatient like me).
- Brown the Butter First: After melting the butter, let it brown for 2-3 minutes until nutty and golden—this adds depth that plain melted butter can’t. Just don’t walk away; burned butter ruins everything (I learned this the hard way).
- Toast the Almond Butter: Warm the almond butter in the same pan for 30 seconds before mixing it in. This softens the texture and lets the flavors meld better—no clumps, no weird aftertaste. (Your future self will notice the difference.)
- Squeeze Lemon Last: Add lemon juice right before serving so the acidity doesn’t turn the beans mushy. A quick squeeze of fresh lemon—even just a tablespoon—brightens the dish without overpowering the almond butter’s richness. (Skip the bottled stuff; it’s not the same.)
Common mistakes when making perfect results
Overcooking the Beans
Green beans turn mushy when overcooked, losing that perfect crisp-tender texture we're aiming for. The biggest mistake? Extending the blanching time beyond 3 minutes.
I've seen people leave them in the boiling water for 5-6 minutes thinking it'll make them softer, but that just turns them into a sad, limp pile. Stick to the exact 3-minute timer and set a reminder on your phone if needed. 🌡️
Skipping the Ice Bath
The cold water rinse after blanching is non-negotiable for maintaining texture. I've made this mistake too—thinking the beans were done after draining. Without that ice water shock, they continue cooking and lose their vibrant color.
Fill a large bowl with ice water and plunge the beans in immediately after draining. This stops the cooking process instantly and keeps them bright green.
Using Stale Almond Butter
Old almond butter develops a rancid flavor that ruins the dish. I learned this the hard way when I used a jar that had been sitting in my pantry for months. Always check the expiration date and store your almond butter in the fridge after opening.
Fresh, natural almond butter should have a smooth, creamy texture with no separation. If yours looks grainy or smells off, toss it. 🥜
Adding Too Much Butter
While butter adds richness, using more than the 2 tbsp called for makes the beans greasy rather than flavorful. I once doubled the amount thinking it would enhance the taste, but it just made the dish heavy.
Measure carefully and remember that the almond butter already provides plenty of richness. The butter is there to carry the garlic flavor, not to overwhelm the dish.
Not Seasoning Gradually
Adding all the salt at once can make green beans taste bland or even salty if you're not careful. Instead, taste as you go and adjust gradually. I recommend adding half the salt during the blanching water and the remaining half when tossing with the almond butter.
This layered approach ensures perfect seasoning every time. Don't forget to taste before serving—seasoning builds throughout the cooking process.
Using Frozen Beans
Fresh green beans are essential for this recipe—they hold their texture and flavor better than frozen. I've tried using frozen beans in a pinch, but they always turn out mushy and lose that fresh green bean taste.
If you must use frozen, thaw them completely first and pat them very dry before blanching. Even then, they won't have the same texture as fresh. 🥦
Nutrition facts
Frequently asked questions
Can I make this recipe with wax beans or snap peas instead of green beans?
This recipe works beautifully with wax beans or snap peas—just adjust the cooking time slightly. Wax beans need about 2 minutes of blanching, while snap peas should cook for 1 minute to maintain their crispness. The almond butter finish will complement all three equally well.
How do I store leftovers to keep them crisp-tender?
Store leftovers in an airtight container in the fridge for up to 4 days. The almond butter helps preserve moisture, but reheat gently in a skillet with 1 tsp olive oil over low heat for just 2-3 minutes to restore crispness. Never microwave—the texture suffers.
What's the secret to getting that glossy finish?
The shine comes from three things: the almond butter coating, the olive oil drizzle at the end, and proper blanching. Don't skip the ice water bath after cooking—it stops the beans from continuing to cook and keeps them vibrant. Toss with the oil right before serving for maximum shine.
Can I make this ahead of time for a holiday meal?
Yes! Prepare everything up to Step 3 (tossing with almond butter) and refrigerate for up to 2 days. When ready to serve, simply reheat in a skillet with 1 tbsp butter for 3-4 minutes, then finish with parsley and olive oil. The flavors actually improve overnight as they meld together.
What's the best way to serve these green beans?
These beans pair perfectly with grilled chicken, roasted turkey, or seared steak. For a vegetarian meal, serve with crusty bread and a simple salad. The nutty flavor also works well alongside baked fish or pasta dishes. Garnish with extra parsley for freshness.