
Side Dishes
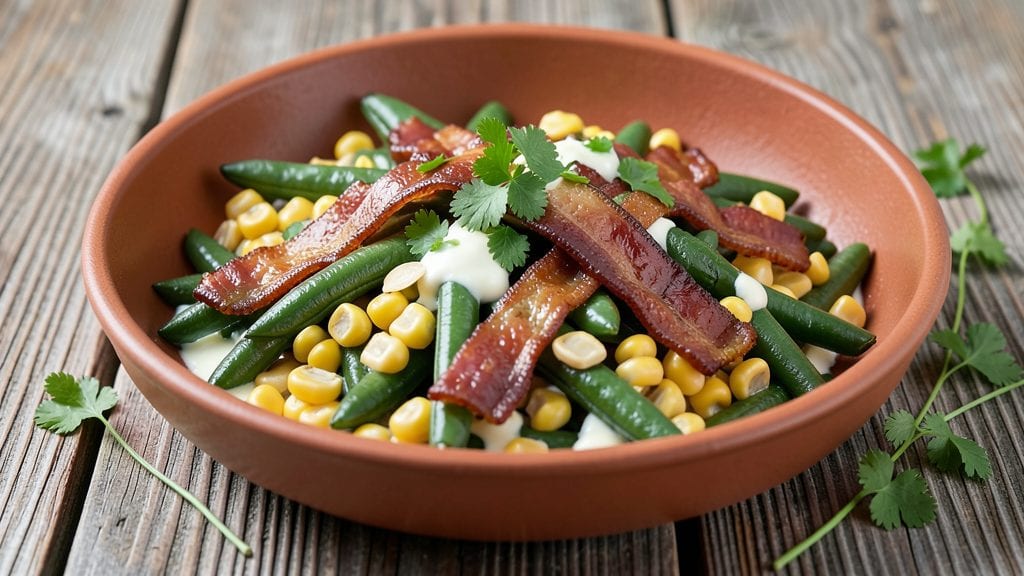
This one-pot canned green beans and corn recipe transforms pantry staples into a savory, restaurant-worthy side dish in under 20 minutes. The secret lies in garlic butter—rich, aromatic, and foolproof—while crispy bacon adds depth that elevates simple vegetables into something special.
I developed this after realizing how often canned beans and corn get overlooked in favor of fresh, but with the right technique, they shine just as brightly.
What makes this recipe work is the balance of textures and flavors: tender green beans and sweet corn wrapped in a velvety garlic butter sauce, with crispy bacon lending a smoky contrast.
No fancy ingredients or complicated steps—just a single pot, minimal prep, and a method that delivers professional results without the fuss. The dish stays light enough for a summer meal but hearty enough to hold its own as a side for grilled meats or roasted chicken.
By the time you serve it, you’ll have a one-pot dish that’s golden, fragrant, and packed with layers of flavor—no one will guess it started with canned vegetables. The garlic butter clings to every bite, while the bacon adds a satisfying crunch that disappears with the first forkful.
It’s the kind of recipe that proves simple ingredients can deliver big impact when handled with care.
Use this as a quick side for weeknight dinners or as a light main when paired with crusty bread or a protein like grilled fish. The best part?
Leftovers reheat beautifully, making it perfect for meal prep. Let’s get cooking—this one-pot wonder is about to become a staple in your rotation.
Ingredients for canned green beans and corn
Pantry staples and a few fresh touches create this restaurant-style one-pot dish.
| Ingredient | Amount | Notes |
|---|---|---|
| Canned Green Beans 🌽 | 2 cups | Drained, no salt added preferred |
| Canned Sweet Corn 🌽 | 1 cup | Drained, kernels preferred |
| Thick-Cut Bacon 🥓 | 4 oz | Chopped into 1/2-inch pieces |
| Unsalted Butter 🧈 | 4 tbsp | Cold, cubed for garlic butter |
| Garlic Cloves 🧄 | 4 cloves | Minced for garlic butter |
| Fresh Parsley 🌿 | ¼ cup | Chopped, for garnish |
| Dried Thyme 🌿 | ½ tsp | Or 1 tsp fresh thyme leaves |
| Kosher Salt 🧂 | ¾ tsp | Adjust to taste |
| Black Pepper 🌶️ | ¼ tsp | Freshly cracked |
| Lemon Zest 🍋 | 1 tsp | From 1 small lemon |
| Heavy Cream 🥛 | ¼ cup | Full-fat for richness |
| All-Purpose Flour 🌾 | 1 tsp | For thickening sauce |
| Garlic Powder 🧄 | ¼ tsp | For extra depth |
The bacon sets the stage—thick-cut is ideal for that satisfying crunch, and Costco or Trader Joe's sell it pre-chopped if you're short on time. Applewood-smoked has the best flavor, but hickory works too. For the green beans, no-salt-added is key; the canned variety from Green Giant or Del Monte works perfectly. Fresh parsley is a must for that bright finish, but dried parsley at one-third the amount will do in a pinch. The garlic butter is where the magic happens—use cold butter cubes for better texture when cooking, and minced garlic (not pressed) gives the most flavor.
No thick-cut bacon? Thin-cut, chopped into smaller pieces will crisp faster, but you'll need to watch it closely. Smoked paprika at a quarter teaspoon adds depth if you're out of thyme. For the corn, frozen corn kernels work just as well—thaw and drain before adding. The heavy cream can be swapped for half-and-half if you prefer a lighter texture, but full-fat delivers the best mouthfeel. If you're watching calories, Greek yogurt at half the amount adds tanginess without the richness. The flour is just for thickening—cornstarch works too if you're gluten-free.
This dish reheats beautifully—cover and warm over medium heat for 2-3 minutes. Keeps for 4-5 days in the fridge, though the bacon loses its crunch after a day or two. Portion into containers with a sprinkle of parsley on top for easy grab-and-go meals. For extra flavor, add a pinch of red pepper flakes when reheating. The garlic butter sauce thickens as it cools, so stir in a splash of warm water if it seems too stiff when reheating.
Why You'll Love This Recipe
- Pantry Magic: I swear by this one when my fridge is empty but the cabinets are stocked. Three cans and a pack of bacon—that’s it. No fancy shopping, no last-minute grocery runs. The only prep is draining the beans and corn, which takes less time than scrolling through your phone.
- Bacon Butter Bliss: That crispy bacon crumbles into the pan, then melts into butter with garlic until it’s golden—not burnt, not bland. The green beans and corn soak up the flavor like sponges, giving every bite that smoky, savory punch. Honestly, the first time I made it, my husband asked for seconds before I even sat down.
- Weeknight Sidekick: This is my go-to when I need something that pairs with everything—grilled chicken, steak, even sandwiches. It’s the ultimate neutral canvas that still tastes intentional. Plus, it’s the kind of dish that lets you play: add a splash of cream for richness, a pinch of red pepper flakes for heat, or serve it cold in wraps for a picnic.
- Budget-Friendly Leftovers: A single batch feeds four, and the leftovers? Even better the next day. The flavors deepen as the bacon fat cools, turning it into a creamy, smoky side that’s perfect for lunches. Between us, I’ve stretched this into three meals without anyone complaining—proof it’s both thrifty and satisfying.
Step-by-step instructions for one-pot garlic butter green beans and corn
This method delivers rich, savory flavors in a single pot—no fuss, no cleanup.
Cook the Bacon Until Crispy
Place the 4 oz thick-cut bacon in a large, deep skillet over medium heat. Let it cook undisturbed for 5-6 minutes until the edges begin to crisp and the fat starts rendering. This initial rendering creates the flavor foundation for your dish.
Once the bacon is golden brown and the fat has mostly rendered out (about 8-10 minutes total), use a slotted spoon to remove it from the pan, leaving the rendered fat behind. Discard all but 2 tablespoons of the bacon fat—this ensures you have enough for crisping the garlic without overpowering the dish. If needed, add 1 tablespoon unsalted butter to the remaining fat to help with browning.
Sauté Garlic and Build the Flavor Base
Add the 4 cloves minced garlic to the skillet with the reserved bacon fat. Cook over medium-low heat for 1-2 minutes until the garlic turns light golden brown—this prevents bitterness. Stir frequently to avoid burning.
Immediately add the 0.25 teaspoon garlic powder and 0.5 teaspoon dried thyme, stirring for 30 seconds to toast the spices. This step deepens the aromatic profile. Then, sprinkle in the 0.75 teaspoon kosher salt and 0.25 teaspoon black pepper, mixing well to distribute the seasoning evenly.
Add Vegetables and Simmer
Pour in the 2 cups drained canned green beans and 1 cup drained canned sweet corn, stirring to coat everything in the garlic butter. Reduce heat to medium-low and let the mixture simmer for 5 minutes, stirring occasionally. You want the vegetables to heat through while absorbing the rich flavors.
During this time, the green beans will soften slightly while retaining their bright color, and the corn will warm through without turning mushy. If the vegetables appear dry, add 1-2 tablespoons water to maintain moisture—this ensures they stay tender and vibrant.
Finish with Cream and Lemon Zest
In a small bowl, whisk together the 0.25 cup heavy cream, 1 teaspoon all-purpose flour, and 1 teaspoon lemon zest. This mixture will create a silky, slightly tangy sauce that ties everything together. Pour it into the skillet with the vegetables and stir well.
Simmer the mixture over low heat for 3-4 minutes until it thickens slightly and coats the green beans and corn. The sauce should be smooth but still light—if it’s too thick, add 1 tablespoon water to adjust the consistency. Taste and adjust seasoning with additional kosher salt or black pepper if needed.
Garnish and Serve
Remove the skillet from heat and stir in the 0.25 cup chopped fresh parsley. The parsley adds a fresh, bright contrast to the rich garlic butter flavors. Let the dish sit for 2 minutes to allow the parsley to infuse slightly.
Serve immediately over toasted bread, with crusty rolls, or alongside grilled chicken for a complete meal. The one-pot method keeps everything warm and cohesive, and the balance of creamy, savory, and bright flavors makes this dish versatile for any occasion.
Pro Tips For Making Canned Green Beans And Corn
- CRISP THE BACON RIGHT: Cook thick-cut bacon low and slow—medium heat, not screaming hot—until edges turn golden and crispy. I used to rush it and ended up with chewy, uneven pieces that didn’t add the crunch this dish deserves. Flip once, then let it render its own fat without fuss.
- DRAIN BEANS WELL—TWICE: Dump those canned beans into a colander and rinse under cold water to wash off that syrupy brine. Then drain again and pat them dry with a paper towel—wet beans steam instead of crisp up in the pan. Trust me, your texture will thank you.
- GARLIC: SMASH DON’T MINCE: Peel those cloves, then smash them flat with the side of your knife before adding them to the butter. Smashing releases more flavor without burning, and you’ll get those aromatic oils infused into the dish instead of bitter garlic bits. (Yes, even if you’re impatient like me.)
- BUTTER: USE THE FAT: After cooking the bacon, leave that rendered fat in the pan—it’s liquid gold for flavor. Add a pat of cold butter at the end and let it melt into the mix. The contrast of rich butter and smoky bacon fat makes this dish taste restaurant-worthy, not canned.
Make-ahead tips for leftovers
Prep Ahead Strategy
This dish is a meal prep dream because the garlic butter sauce and bacon flavors deepen overnight. Cook the bacon and garlic butter base completely, then store it in an airtight container in the fridge for up to 3 days.
When ready to serve, simply reheat the base with the vegetables—just 2-3 minutes on the stovetop. This saves you 15 minutes of prep time on busy weeknights. 💪
Freezer-Friendly Method
For longer storage, freeze the fully cooked dish in single-serving portions using silicone molds or glass containers. The garlic butter sauce stays rich when thawed, but add a splash of warm water if it seems too thick after reheating.
I recommend freezing for up to 2 months—the bacon stays crispier when reheated from frozen in a skillet. Label containers with the date to track freshness. ❄️
Vegetable Prep Shortcut
Drain and rinse the canned green beans and corn up to 2 days ahead—store them in separate airtight containers with a paper towel to absorb excess moisture. This prevents sogginess when reheating.
When ready to cook, simply toss them into the skillet with the prepped bacon base. This step cuts 5 minutes off your cooking time. 🌿
Bacon Rendering Hack
Render the bacon a full day ahead and store the fat in a small jar in the fridge. Use it to sauté garlic and vegetables later—it’s already infused with smoky flavor. I keep a jar of bacon fat on hand for quick stir-fries and roasted veggies.
Just reheat the fat gently before using to avoid splattering. This trick adds extra depth without extra effort. 🥓
Sauce Pre-Mix Option
Mix the heavy cream, flour, and lemon zest into a small jar and refrigerate for up to 3 days. Shake well before adding to the skillet—this ensures a smooth, lump-free sauce every time.
I even make a double batch to use in other recipes like mashed potatoes or pasta. Store it in the fridge and bring to room temperature before using. 🍋
Portioning for Meal Prep
Divide the fully cooked dish into 4-6 meal prep containers with a sprinkle of fresh parsley on top. The parsley stays vibrant for 2 days in the fridge, adding a pop of color to each serving.
For extra flavor, add a pinch of red pepper flakes when reheating. This method keeps the dish tender and flavorful for up to 4 days in the fridge. 📅
Nutrition facts
Frequently asked questions
Can I use frozen corn instead of canned?
Frozen corn works perfectly—just thaw and drain it thoroughly before adding to the skillet. The texture will be slightly firmer, but it absorbs the garlic butter sauce just as well. For best results, use corn kernels rather than pieces to maintain even cooking.
How do I prevent the green beans from getting mushy?
Simmer the beans for only 4-5 minutes over medium-low heat—any longer and they’ll turn soft. Stir occasionally and avoid high heat, which breaks down their structure. Adding a splash of water if needed keeps them tender without losing shape.
Can I make this dish without bacon?
Yes! Swap the bacon for 4 oz diced ham or 2 tbsp olive oil for a vegetarian version. If using oil, sauté the garlic in it first to build flavor. The dish will still be delicious—just slightly less smoky.
What’s the best way to reheat leftovers?
Reheat in a skillet over medium heat for 2-3 minutes, stirring occasionally. Add 1 tbsp water if the sauce thickens too much. Avoid microwaving—it makes the bacon soggy. For extra crispiness, broil for 1 minute at the end.
Can I add other vegetables to this recipe?
Try adding ½ cup diced bell peppers or ½ cup cherry tomatoes with the corn and beans. Sauté them first with the garlic to soften slightly. Zucchini or peas also work well—just adjust cooking time to 6-7 minutes total.